 |
||||||
| School of Medicine • University of Washington • Box 357735 • 1705 NE Pacific St • Seattle WA 98195 | ||||||
Quick Start Guide¶This will guide the user through the process of using Xpression, at a rapid pace. For more detailed guidance, please see Installation and Xpression user guide. What you will need
Procedure¶A sample sequencing file will now be analysed using Xpression. Each step is explained in further detail in Xpression user guide. Obtain Xpression¶Download Xpression GUI to your harddrive. Get the dataset¶Download the dataset from Example Dataset and uncompress this file to a convenient directory. Three files are packed inside: CGA009.fasta, CGA009.gbwithparts, and example.fastq.bz2. The fastq file is compressed and can be used as-is to conserve space. Start Xpression¶Start the Xpression application by double-clicking the Xpresson.jar from a where it was downloaded. 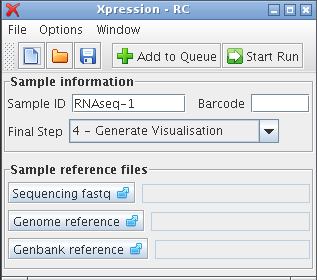
empty main window Enter sample-specific information¶In the Sample Details area, enter the barcode sequence of ACCC into the barcode field, and the name Example1 into the Sample ID field. Define reference files¶In the Sample References area, there are fields for each of the three required reference files. For each of these three reference files, do the following:
Begin analysis¶Click the Explore results¶Once Xpression analysis is finished, the upper-right button will change back to In this case this will be your home folder > Xpression_results > example > Example1, since output directory is your_home_directory/Xpression_results, the sequence filename is example.fastq.bz2, and the sample ID is Example1. | ||||||
 Start Run button in the upper-right corner. This button will now change to
  Stop Run, to allow processing to be cancelled. Two windows will become visible, a run list and an Xpression output log window.