Gravity fed irrigation
By Pat Kendzierski
A gravity fed irrigation system is a cheap effective
way to provide water for a smaller sized crop area. It would be especially cost
effective if the climate of the area can provide enough precipitation to
consistently keep a reservoir filled using rain water harvesting techniques.
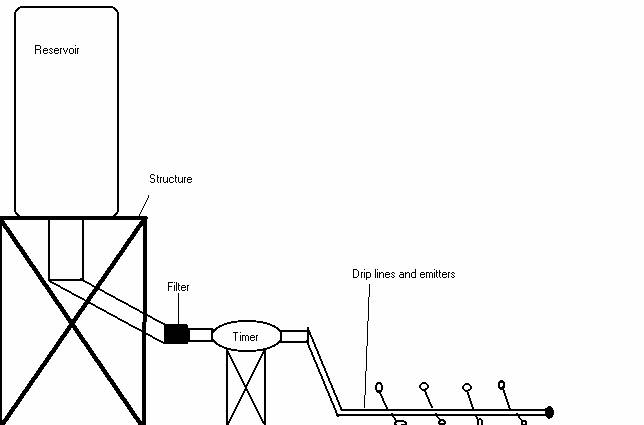
The basic system is very simple consisting of an elevated reservoir with a pipe
coming out the bottom that feeds water into a basic drip irrigation system that
is all controlled either by hand or with a very efficient battery powered timer
that controls the rate at which the crop is watered.
The
components needed include:
1. A water reservoir
-
It must be able to contain at least one days worth of water
-
The greater the capacity of the reservoir is proportional to how often
it must be refilled
-
The complication of having a very large container is that you must
elevate it above the crop and refilling a very high container is more work
-
The reason to elevate the tank is that it adds pressure which needs to
be kept consistent at the point where the drip lines are fed so that the water
is distributed equally
2. A structure to support the
water reservoir
-
Can be constructed of anything that can support the weight of the container when it is filled with water
-
It must also be able to withstand outside forces such as the wind
-
An 880 gal container full weighs 4 tons
3. Piping
-
There must be a pipe at the base of the reservoir that lets water flow
out and having a shut off valve at this connection point is a good idea if the
reservoir is larger than one days worth of water.
-
The piping if using the timer method then feeds the water through a
filter
-
Different sized piping should be used to increase the pressure
-
This is done by gradually decreasing the size of the lines being used
such as starting with a 2ft line at the base of the reservoir then decreasing
the size every 1-4ft so that it would then be a 1ft, 6in, 3in, 1in, 1/2in, down
to the 1/8in emitters in the drip lines
4. Timer and Filter
-
There are many models of battery powered timers that can be set up and
run for a whole season
-
These timers control the frequency that water is emitted into the drip
lines
-
A filter must be installed in the water line before the timer valves
-
This prevents the smaller lines from becoming clogged
5. Valves and Drip lines
-
Shut off valves should be placed between the reservoir pipes and the
irrigation pipes and before the timer valves
-
Drip lines are the average lines and emitters that can be purchased at
any garden supply store
The
Construction:
If you
are using a small system that can be refilled daily with no timer it can be created
for about 20 dollars.
If
you use the large system the price will vary greatly depending on what is
bought at what price so for safety I will round up on the average price of
materials.
The
Small System:

This
can be done using a 5gal bucket as a container, anything that stands at least
4ft off the ground as the structure, conventional 32mm hose that you can punch
holes into and add another bit of line so that the water in precisely delivered
to the roots.
The
Large System:
I haven’t seen this
design fabricated so this is only to illustrate the concept
The
reservoir should be as large as necessary because the smaller it is the easier
it will be to fill and support. The structure must be very stable such as
concrete or well braced metal, wood, stone. The piping is PVC and con be cut into any size and various joints are available so
that any shape or adaptation to size can easily be made. The filter can be
bought at any garden center and must be flushed periodically. The timer can
also be bought at a garden center but research may provide a cheaper or higher
quality product. The drip lines are standard sizes and are easily set up.
Maintenance:
The
hosing may need to be replaced after a season of being exposed to the elements
but if it is winterized by draining and indoor storage the can last for several
years. The timer’s battery must be replaced after each season. The filter must
be flushed periodically and simply opening a valve on the filter usually does
this. The structure should be examined to make sure it is sound before filling
it. The container should be washed out with bleach before being used for a
second season.
#44355, 1/2" Antelco In
Line Filter @ $ 3.19
$ 3.19
#50038 Antelco Miracle Punch @ $ 18.50
$ 18.50
#45545 Antelco 1" Green Back Valve @ $
4.94
$ 24.70
1" Screen Filter #API 4E-1A-150 @ $ 24.00
$ 24.00
Auto. Digital Hose Faucet Timer #CONT 62001 @
$ 56.50
$ 56.50
#40195 Antelco .18" Joiner (Each) @ $
0.10
$ 5.00
#40295 Antelco .18" Elbow (Each) @ $ 0.18
$ 1.80
1/2 x 500 Poly Tubing ($6 Handling Fee
included) @ $ 41.00
$ 41.00
Total: $ 174.69
+
$200 or more
$350-500
This
price summary does not include the reservoir or the material for the structure.
They will vary greatly depending on what type of materials are used.
These
systems are very simple and can be modified greatly. This was supposed to
present the concepts and a method but there is surely innumerous ways this can
be changed or enhanced. Experiment with whatever seems to make the most sense.