ESRM 412 – Native Plant Production
Spring 2005 – Prof.
Guidebook
for Native Plant Propagation:
Development
and construction of an air-pruning propagation bench, and its proper use
Why use such a
system?
An
air-pruning propagation system is a low-cost, efficient method of propagating
cuttings, seedlings or container plants for restoration projects. Air pruning happens naturally when roots are
exposed to air in the absence of high humidity.
The roots are effectively “burned” off, causing the plant to constantly
produce new and healthy branching roots.
If roots are not exposed to air, they continue to grow around the
container in a constricted pattern. The
roots may spiral, twist, kink or become strangled. When the plant is later installed it will
likely fail to establish a normal root structure, and instead will have reduced
uptake of water and nutrients.
Eventually abnormal growth should be obvious and could cause the plant
to fail. Damaged root systems also cause
leaves to turn yellow or brown, shrivel or drop. Healthy, highly branched root structures
allow a plant to more efficiently uptake water and nutrients while increasing
growth and overall plant health. A
strong root system will make a plant better able to establish itself when
installed in a restoration project.
 Strangled
 Twist
Twist
 Crank handle
 Pot-bound
 Spiral
 Well
developed
Well
developed
[i]Comparison of
poor root structures to a well developed root structure
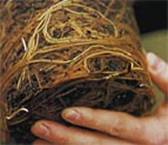
[ii]Pot-bound
roots
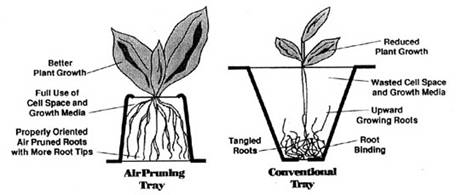
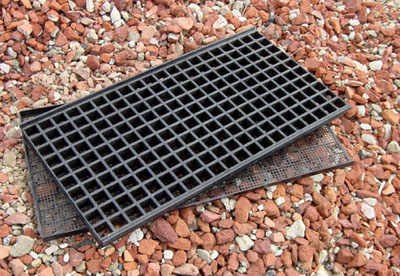
[iii]Example of air-pruning using commercially available plug trays
Advantages of air-pruning:
·
promotes
branched root systems
·
encourages
new roots to sprout
·
prevents
roots from spiraling
·
prevents
plants from becoming pot-bound
·
plants
may remain in pots, plugs or plant bands longer
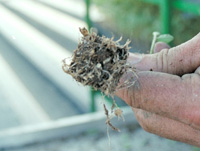
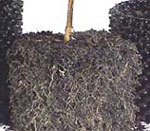
[iv]Branched root
structures resulting from air-pruning methods
[v]Healthy air
pruned roots at open base of cell
How do you most effectively utilize an air-pruning bench?
Depending
on the climate and plant material the benches may be set up outside, in a hoop
house or greenhouse. In an enclosed
structure more careful monitoring of humidity and air flow is necessary.
Watering
should be done from above either manually, with a drip irrigation system or a
mist system. When propagating cuttings
or seedlings a mist irrigation system may be the best option. The misting system can be constructed using irrigation
supplies from your local hardware store or kits are available from many online
retailers.
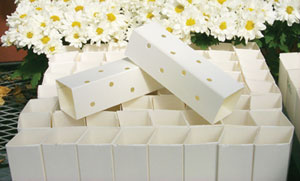
[vi]Plant bands: note the side holes for promoting lateral root pruning
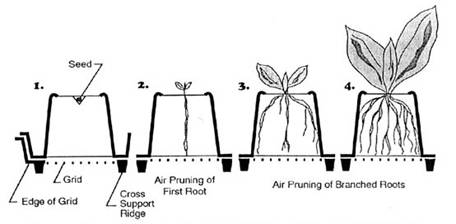
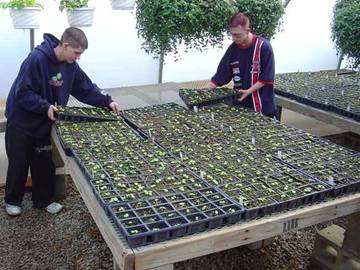
Seeds or
cuttings should be propagated in plugs or plant bands. Plant bands are open-bottomed paper sleeves
and are highly recommended (see www.hummert.com). Roots easily air-prune below and the paper
will decompose when planted. Plugs may
be less effective, needing lots of openings for air to hit the roots, including
side slits. Any side air contact in
either the plant bands or plugs will help to prune the lateral roots. It also can be difficult to remove plant
material from plug trays.
[vii]Air-pruning
plug tray with open bottom and mesh base
When using
plant bands it is vital to remember to carefully monitor moisture levels as the
paper sleeves can wick water away from the plant.
It is
important to use a soil mixture that has a high water holding capacity to
accommodate the extensive root structure development and tendency of plant
bands to dry out. Drainage should not be
an issue as the bench is suspended off the ground.
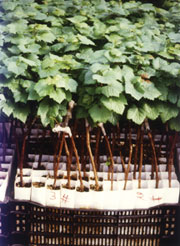
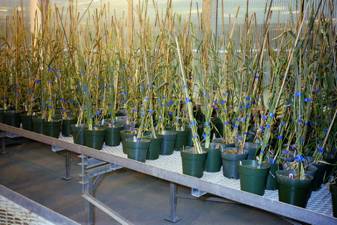
Air-pruning
is also highly effective for propagating trees.
It increases the “shelf-life” of the plant material, prevents root
circling, and increases the success of plant installations because the
transplants establish quickly. Using
such systems eliminates the need to re-pot as the tree grows, as small plants
can be potted directly into large containers.
This type of pot causes the plant to develop a dense root ball of tiny
white roots filled with carbohydrates, ready to branch out when planted. The root ball may also be more resistant to
extreme temperatures. This can greatly
increase the survival rate of plant material installed in a restoration
project.
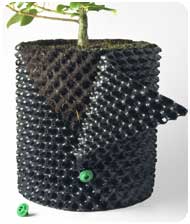
[viii]Air-pruning pots are used to eliminate root circling in tree production
This shows eucalyptus root
development using an air-pruning pot
How do you know the roots are air-pruning properly?
No roots should be visible outside
or beneath the container. If you can see
small white tips of roots try:
·
increasing
the air flow with fans
·
raising
up the bench
·
decreasing
the humidity (increase ventilation)
The propagation bench:
Many
different designs would be effective.
The basic needs are an open metal surface raised up off the ground, such
as a mesh, that allows air to flow freely.
It should be at least 16-24” high to allow air to circulate
beneath. Standard height for a typical
(non-air-pruning) propagation bench is 36”.
This height accommodates someone in a wheelchair to get up close to the
plants. The frame can be constructed out
of treated lumber, metal, concrete or plastic.
While concrete makes a very sturdy table that can support great amounts
of weight, it is a much more permanent type of construction than the other
options.
[ix]Metal benches such as this are highly effective, and are readily
available online
[x]Materials List:
- Coated wire--14 gauge, 1-inch grid
- Treated lumber frame, 2-inch by 4-inch
- Cinder block legs
Construction:
To build a relatively inexpensive and sturdy bench you’ll need to construct a wooden frame and create a surface of wire mesh. The precise dimensions of each table should vary according to your particular needs. In this example the base of the bench is made of two 16” cinder blocks and a 16” piece of the 1-inch by 4-inch treated lumber.
· Lay the bottom cinder block horizontally on the floor.
· Set the second cinder block vertically centered on the bottom block
· Lay the 16” piece of lumber flat across the upper block
· rest the frame on these legs, placed 4’ on center along the edges of the bench
The frame should be 4 feet deep, and may be as long as needed for the space. 2-inch by 4-inch treated lumber should be used to construct a simple frame to which the mesh metal surface is attached.
The height of the bench can be raised by adding additional horizontal cinder blocks. This design will yield a bench the recommended height of at least 16-24”.
[xi]This shows a similar bench. Here the legs have been placed at the corners.
Resources:
1) http://www.renaldo.org/renaldosales/ag/airprune.html
2)
http://www.wvu.edu/~agexten/hortcult/greenhou/grencons.htm
3)
http://www.greeningaustralia.org.au/GA/NAT/TipsAndTools/Library/Growingseedlings.htm
4)
http://courses.washington.edu/ehuf462/Lecture_Notes/Advantages_and_Disadvantages_of_Planting_Material_Form.doc
5)
http://www.haxnicks.co.uk/
6)
http://www.rootmaker.com/faqs.php
7)
www.cherrylake.com/Resources/RoomToGrow.pdf
8)
http://www.superoots.com