Accessible Pages in Canvas
Accessibility By Design
Taking a proactive approach to accessibility in your course isn’t just the right thing to do, enhancing equity and inclusion—and saving time in the future—it’s the law. With Canvas pages, it’s also easy!
Front Matter
Teaching Tip Live Page: https://depts.washington.edu/atuwt/go/ttl-accessible-canvas-pages
Teaching Tip Live Canvas Module: https://depts.washington.edu/atuwt/go/ttl-accessible-canvas-pages-canvas-modules
Presentation Recording:
https://depts.washington.edu/atuwt/go/ttl-accessible-canvas-pages-presentation-video
Why We Should Care
Accessibility vs. Accommodation
Most instructors have received official accommodation requests—such as a requirement for captions, extra time for exams, etc.—facilitated by the office of Disability Resources for Students. Acting reactively and retrofitting your course to meet these needs can be complicated and time-consuming.
It’s better to act proactively and, where feasible, create materials that are accessible by design. This not only potentially saves the time required for later remediation, but it makes your course both more inclusive and allows your material to work with secondary tools, ranging from screen-readers to note-taking applications and many more.
Remember: for a variety of reasons, many students do not disclose their disabilities or experience, as I do, a less significant issue such as minor loss of hearing, that doesn’t demand formal accommodations.
The Legal Requirements
Applicable Laws and Legislation
As noted above, designing for accessibility isn’t only the just and equitable thing to do, it’s also a matter of law:
- Section 504 of the Rehabilitation Act of 1973 prohibits discrimination based on disability by institutions that receive federal funding.
- Title II of the Americans with Disabilities Act (ADA) prohibits discrimination against people with disabilities and applies to all public colleges and universities, regardless of whether they receive federal funding.
- Washington State OCIO Policy #188 - Accessibility "establishes the expectation for state agencies that people with disabilities have access to and use of information and data and be provided access to the same services and content that is available to persons without disabilities
Practical Effects of Legal Requirements
Practically speaking, the legal requirements demand that, as far as you are able, learners with disabilities:
- Must have formal accommodation requests fulfilled.
- Must have equal access to course materials, including material of the same quality within the same timeframe as their peers.
- Cannot be denied service due to their disability.
Web Content Accessibility Guidelines
The Web Content Accessibility Guidelines (WCAG) explain how to make web content more accessible to people with disabilities. Each guideline has three levels of accessibility, ranging from A (lowest), AA, and AAA (highest). In general, striving for AA compliance is our goal.
The Nuts and Bolts of Accessible Canvas Pages
The Canvas Rich Content Editor

Although we are focusing on Canvas Pages here, all the following apply anywhere the Rich Content Editor (RCE) (the editor that looks vaguely like Microsoft Word) is used, which includes Announcements, Assignments, Discussions, Pages, Quizzes, and Syllabus.
Structure and Headings
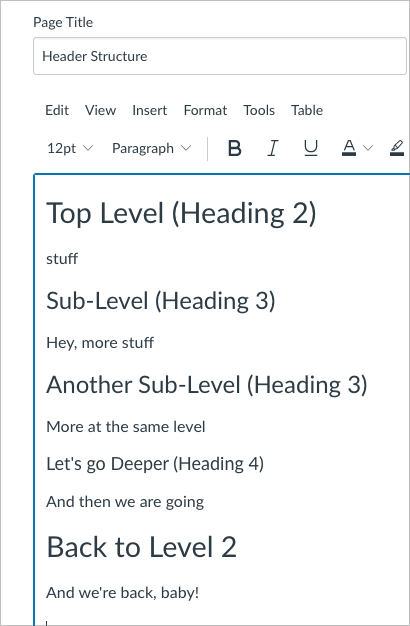
The basic message here is: use Headings (Headings 5-6 are available via the Format > Formats > Heading menu) to structure your text. And the Headings on your page should always start with Heading 2 and either repeat or work their way “down” in size from 3-6 without skipping any. You may skip headings when moving back “up” the scale.
Often these guidelines are broken because users mistakenly use Headers for visual formatting when their intent, because of the HTML language that is used beneath the scenes, is to represent semantic (logical) structure.
Thus, an inaccessible use of headers, chosen for their visual value rather than logical structure, might look like this:

While a sound header structure might look like this:
Header Formatting
Note that you can still format the font size, style, color, etc. of your Headers. As long as you have the correct Header selected, you can use the Rich Content Editor toolbar buttons and the Format menu to change the visual appearance. Here is an intentionally extreme (and extremely ugly), but still accessible, example:

Text Formatting
The Canvas Rich Content Editor gives you many options for formatting text (color, styles such as bold, underline, and italic, foreground and background color, and more. The key principles here are:
- Don’t use visual formatting to denote logical sections.
- Don’t rely on bold (strong) or italics (em) to convey emphasis, most screen readers do not recognize them.
- Reserve the use of underlined text for links.
Here’s a visual example of what to avoid:

Note that the Canvas Ally Accessibility Checker does not flag this kind of formatting as a problem because it cannot interpret the context and semantic intent. But it is an issue.
Lists
Proper list formatting allows assistive technologies to identify a list, enumerate the items, and enable the user to navigate the list.
As with Headings, the important message here (are you sensing a theme?) is to use the Rich Content Editor list formatting to create lists. In addition to occurring when users aren’t aware of the list formatting tools, text that is copied may contain improperly formatted lists or be converted to plain text lists when pasted.
In this example, the first list is formatted properly, the second manually using special characters and indents. Though they look quite similar, the second list is an obstacle for screen readers:

Much of the time, a manually formatted list will look wrong. If you’re unsure, test by placing your cursor on the first list item and select a List Style from the menu. If the bullet toggles off, then your list should be fine; if not, you can delete the bullet and use the list buttons again.
Note that the Canvas Ally Accessibility Checker does not flag this kind of formatting as a problem because it cannot interpret the context and semantic intent. But it is an issue.
Images and Alt Text
As you probably already know, Alt Text is used by screen readers and other assistive technologies to describe an image to the user. As a result, it is important that your Alt Text describes the image in a useful way, rather than just say what it is, but ideally using 120 characters or less. If an image is decorative, you should leave the Alt Text empty and use the checkbox.
No matter how you insert an image into a Canvas Rich Content Editing area (used for Pages, Quiz and Assignment Descriptions, Discussions…pretty much everywhere you can add more than one line of text), you will have an option either at the time, or by clicking on the image and selecting clicking the “Image Options” popup, you will have an option to either provide Alt Text describing the image or mark the image as decorative:

Tables
First, don’t use tables for layout purposes, such as to create columns. In (X)HTML, the lingua franca of the web, tables are intended for presenting tabular or matrix data.
Second, I am sharing here a short list of directions. For more information, along with graphical step-by-step instructions, see this Canvas Community Guide on Table Accessibility in Canvas.
A Simple Shortcut
Create your table and data, then use the Accessibility Check icon below the Rich Content Editor window (not the one above it!) to remediate your table and perform the below steps simply and more intuitively.
Step-by-Step
- Add a caption to the table by selecting the table and using the Table > Table Properties menu item.
- If you have a Header Row (describing the columns below), select that row, then use the Table > Row > Row Properties menu to set the Row Type to “Header.”
- If you have a Header Column (describing the rows below), select the Column, then use the Table > Cell > Cell Properties to set the Scope to “Column” and the Cell Type to “Header Cell.”
A Note About Canvas Media Recordings
Recording video in the Rich Content Editor, particularly as part of commenting, assessment, and grading, is an excellent way to enrich student engagement and learning. However, keep in mind that there is no direct way to caption these videos as there is with Panopto and Zoom recordings, so this is not a function that should be used to create primary content or with students who are deaf or hard of hearing.
Using the Canvas Accessibility Checker
Your efforts to create accessible Canvas content is bolstered by the built-in Ally Accessibility Checker. When editing using the RCE, you will see two indicators:
- At the top right, just above the content editing area, there is a dial showing the current content’s accessibility status as a percentage.
- Below the editing area, next to the current Word Count, there is an accessibility icon that will show the number of current issues.

In either case, clicking on the indicator will take you through the errors and give you a chance to fix them. If you spot the errors on your own, simply make changes and the indicators will adjust accordingly, in real-time.
Important Note (I know I am repeating myself): the Accessibility Checker can only detect some accessibility issues based on technical specifications. In this guide, for instance, the checker will not usually detect using formatted text to create pseudo-headers, lists that do not use the built-in list tools, or the absence of captions for embedded media. Nor, naturally, ensure that your Alt Text for images is sufficient and accurate.
Resources
Trying a Screen Reader
It is enormously helpful to experience using a screen reader for yourself. This will help you immediately grasp the importance of accessibility and better understand some of the finer points of implementation.
- Windows users: If you have an active UW NetID, you are entitled to a free license to commonly used Scientific Freedom products: the screen reader JAWS, the application Zoom Text, or Fusion, which combines both.
- Mac users: you can get a reasonable idea of how your content works with screen readers using the built-in VoiceOver utility.
Get Your Passport Stamped! |
Teaching Tip Live by Chris Lott <clott@uw.edu> | 9/12/22 | Updated 9/17/22
University of Washington Tacoma Office of Digital Learning – https://tacoma.uw.edu/digital-learning
Free to share and adapt: Creative Commons License CC BY-NC