Session 2: Sample Collection & Packaging
This session will cover how to properly collect viral load samples, how to correctly complete the forms, and how to address transportation of samples.
Learning Objectives
By the end of this session you will be able to:
- Collect whole blood samples
- Collect dried blood spot (DBS) samples
- Complete the viral load laboratory request form correctly
- Package samples appropriately
Learning Activities
-
Quiz: Pretest (10 min)
-
Reading: VL Sample Collection (5 min)
As the starting point for viral load (VL) monitoring, properly collecting samples is key. The quality of the result produced depends on the quality of the sample sent.
When we discuss VL sample collection, there are two types of samples that are used—plasma and dried blood spot (DBS). We’ll go into more detail about the procedures to follow for each type of collection, but let’s start by discussing the basics for both.
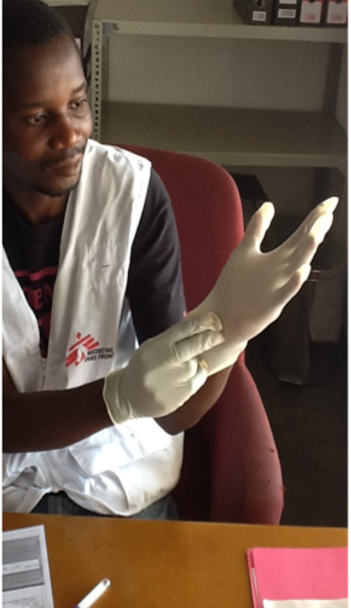
Throughout the sample collection process, we need to make sure that we follow the standard infection control procedures, including hand washing and wearing gloves. A sharps container also needs to be available. Double check that all supplies are ready before beginning to collect a sample.
There are several important best practices to keep in mind to ensure that collection is a success:
- Communication: Communicate with your lab on any issues that may have occurred during sample collection
- Transportation: Send samples to the lab on time to avoid rejections
- Handling: Only touch samples when wearing powder-free gloves
- Forms: Fill out the forms associated with each sample completely and legibly
When collecting the samples start by identifying the client using their full name and birthdate. Make sure that you know whether they are there for either routine or targeted testing. See the viral load test request form video below to learn how to complete the form.
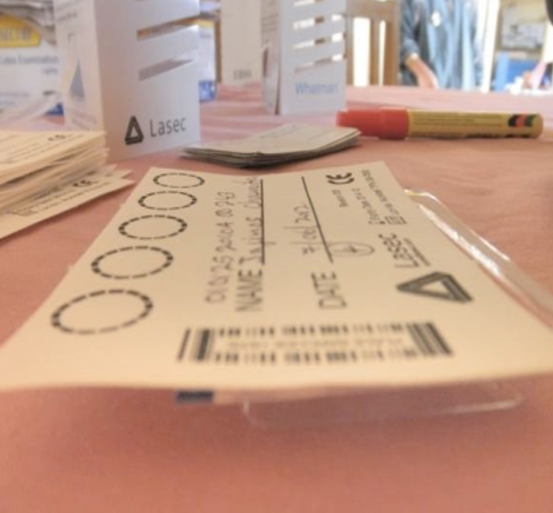
Venepuncture is the method of collecting a blood sample from a client. If you are collecting a plasma sample, the vacutainer system is the preferred system to use. When using the vacutainer, let the blood flow on its own until it stops and is approximately the correct amount. Make sure to label samples with the provided barcode stickers. This is a very important step, as it ensures that the sample is linked to the client. If you have a barcode sticker, make sure to put it on the sample to avoid the sample being rejected. If you do not have barcode stickers, make sure to clearly print patient identifiers on the sample (name and OI number).
-
Video: Filling out the VL Request Form (10 min)
-
Quiz: Filling out the VL Reqest Form (10 min)
-
Reading: Whole Blood Collection (5 min)
There are two types of tubes used for plasma VL collection: the EDTA tube and the PPT. For both tubes, you will collect at least 4 ml of whole blood. This is easy to measure if using a syringe.
If you overfill the tube, the top will come off and you’ll lose the specimen. Immediately after collecting the blood, mix the blood in the tube to keep blood clots from forming. Do this by tipping the tube over gently to mix at least 10 times. If there are clots, the sample will be rejected.
Tap the following tube types to learn specific information about each one:
EDTA tube

The EDTA tube is commonly known as a FBC (full blood count) or purple top tube. This tube contains a strong anticoagulant and is most often used when whole blood is needed for analysis. It’s recommended that samples collected in EDTA tubes that are kept at room temperature reach the lab within six hours. This timing can be extended to 24 hours if they are kept in cool temperatures especially with ice packs and cooler boxes. EDTA tubes can be stored for up to 24 hours if kept at a stable temperature between 2-8°C. If a sample collected in an EDTA tube isn’t able to be transported within the needed time frame, the sample can be processed using the dried blood spot (DBS) method instead.
After being collected and packaged, blood specimens in EDTA tubes will either go directly to the VL test lab or to the district laboratory, depending on the distance to the testing lab. The district lab will prepare the sample before it is transported on to the VL test lab. Before processing, the sample in EDTA tubes are centrifuged so as to separate the plasma from the rest of the sample. The separated plasma will then be stored in cryo tubes ready for testing. Once prepared, the tubes can be stored refrigerated for a longer period before testing.
PPT
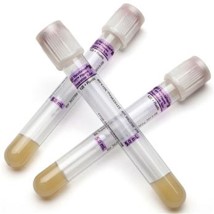
When using a PPT (plasma preparation tube) for sample collection, the sample must be sent to the lab within 24 hours and can be kept at room temperature.
Blood specimens in PPTs can also be transported directly to the VL testing lab or, depending on the distance, to a district lab first. The difference between EDTA tubes and PPT is that PPT have gel in the center that will separate plasma and blood cells when they are spun during centrifuging. If processed at a district lab, the tubes are then transported to the VL test lab. PPT samples should not be frozen.
-
Quiz: EDTA or PPT? (5 min)
For each statement, indicate whether an EDTA tube, PPT, or both would be appropriate.
-
Video: DBS Sample Collection (9 min)
-
DBS Sample Collection (10 min)
When using the dried blood spot (DBS) method, whole blood is collected on filter paper and dried before sending to the laboratory for analysis.
DBS is used for VL sample collection when the facility is far away from the district lab because the sample will last longer than a plasma sample. DBS samples are also considered more stable, easier to store and transport, and less infectious.
Sample collection procedure
Tap on each step in the DBS VL sample collection timeline:
Location:
Select an appropriate location. DBS samples should be collected in a space away from direct sunlight that has little moisture, is dust free, and is easy to disinfect and damp dust. Surfaces used for collection should be impermeable to liquids in case of blood spillages. Ideally, the collection area should be spacious and well-organized rather than cluttered and cramped. Following these guidelines will help reduce errors and contamination in the collection process.
Preparation
Prepare for sample collection. When collecting a DBS sample, the DBS kit includes everything you will need except for the request form. Start by putting on the powder-free gloves supplied in the kit.
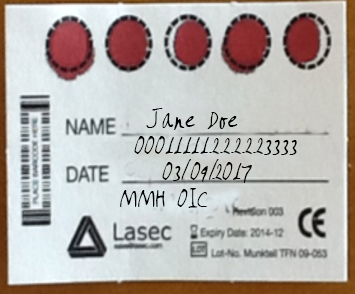
Next, prepare your DBS card with all the required information: the client’s name, OI/ART number, date of specimen collection, and clinic and district name. As you fill out this information, make sure not to touch the circles on the card as this will cause them to become contaminated.
Before spotting the card with blood, position the card by placing it with the circles over the edge of the rack. This avoids contamination. If a rack isn’t available, use the packaging from the vacutainer.
Collection:
This procedure is no different from collecting DBS samples for EID from infants. You can prick the infant’s finger or heel (as seen in the video above) to collect blood onto the filter paper. The blood can also be collected via a needle and EDTA tube in older children and adults.
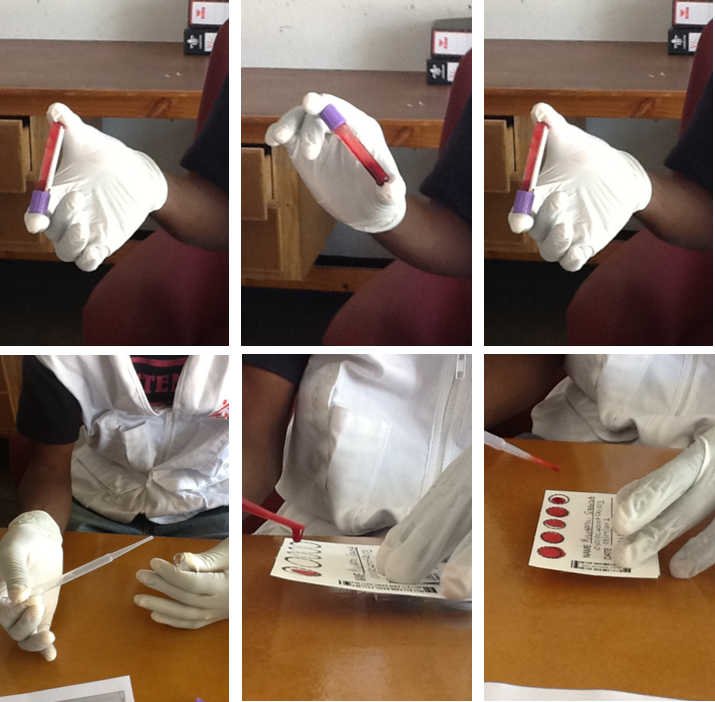
Once the blood is in an EDTA tube, mix it by tipping the tube up and down three to four times (tap on image to enlarge). Next, open the EDTA tube. Squeeze the end of a sterilized Pasteur pipette and place it into the tube. Release the end of the pipette. Holding the pipette over the first circle, squeeze it and allow a full drop of blood to fall onto the card. Make sure that the entire circle is fully spotted with blood. Repeat this procedure for all five circles. If the circles are not completely filled in or if they are filled in with a lot of overlap, the sample will be considered invalid and won’t be able to be processed.
Never touch the circles, or the specimen will be contaminated.
Drying:
Once the blood has been applied to the card, place the sample on the drying rack. It’s imperative that the drying rack is kept away from direct sunlight. It’s equally important to make sure that the cards don’t touch one another on the rack. If you don’t have many samples, you can do this by leaving one empty space in between each card on the rack.
Samples need to be completely dry before packing, which will take at least three to four hours, if not longer. Often samples aren’t dry by the end of the day and will need to stay overnight on the rack. As soon as the sample is dry, however, it must be packaged. A frequent mistake made with DBS samples is that they are allowed to sit too long without being packaged, this can cause contamination of the sample. For this reason, if a sample is left to dry overnight, make sure to go back in the morning to ensure that the samples are properly packaged.
Packaging
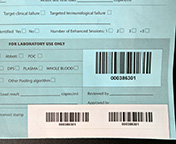
Before packing up a sample, it’s critical to attach the supplied barcodes that are on the viral load form.
Remove the two barcodes from this form and attach one to the DBS card and one to the outside envelope.
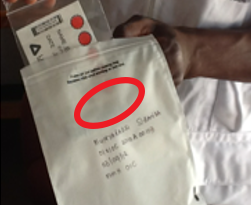
When packing the samples, each card must be packed separately in its own ziplocked plastic bag. Each individual ziplock bag should contain: one sample card, desiccant, and the completed request form. Store at room temperature.
Mailing:
Last, send samples to the laboratory within a week of preparation.
-
Quiz: DBS (5 min)
For each of the following statements, mark whether it’s true or false.
-
DBS vs Plasma Sample Collection (10 min)
When deciding whether to collect DBS or plasma samples, it’s important to know which type of samples your local lab processes. Which tube you use depends on how far the facility is from the VL test lab. If you’re close to a VL test lab, use EDTA tubes. If you’re further away from the viral load test lab, PPT would be a better option, since they can store blood for a longer time before processing. If you don’t have access to transportation or the lab is very far away, choosing DBS would be the best option.
Refer to the MoHCC VL Referral Laboratory Testing Services and Contact Persons listed in the resources.
Plasma and DBS sample collection methods each have benefits and drawbacks. Tap each factor to consider to see how DBS and plasma compare to one another.
Factors to Consider
Collection costs factors
Plasma DBS More expensive collection costs Cheaper collection costs Storage parameters factors
Plasma DBS Requires stringent storage and processing must be completed within 24 hours Can be stored at room temperature and can be stored longer than plasma samples Shipment costs factors
Plasma DBS More expensive shipment costs Lower shipment costs Sensitivity factors
Plasma DBS Comparable sensitivity to DBS Comparable sensitivity to Plasma Processing factors
Plasma DBS It is quicker and easier to process plasma samples DBS samples require much more work to process and therefore have a longer turnaround time Scaling up factors
Plasma DBS There are more challenges to scaling up plasma sample collection There are fewer challenges to scaling up DBS sample collection -
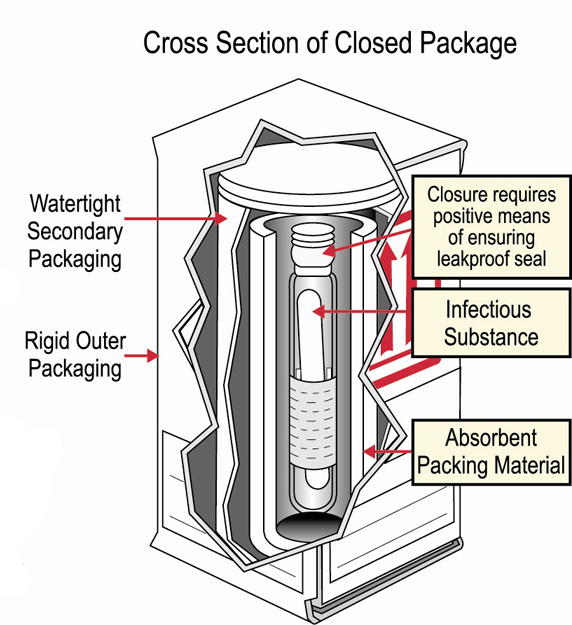
Reading: Packaging Sample for Transport (5 min)
When preparing samples for transportation, triple packaging is the preferred method. It not only protects the sample and allows it to arrive in good condition, it also protects the environment and the carrier.
Triple packaging requires three layers of protection. Tap on each layer to learn more:
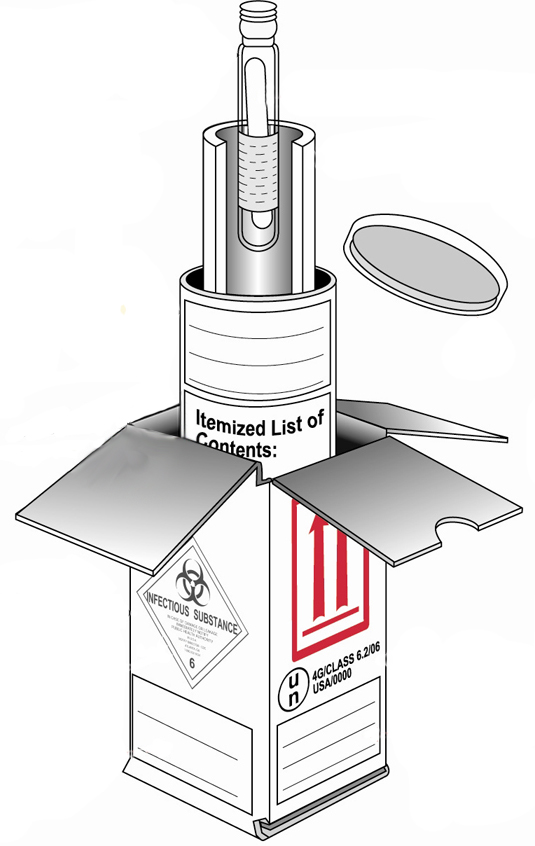
Primary receptacle
This is a leak-proof specimen container.
Secondary packaging
This is also a leak-proof container that encloses and protects the primary receptacle(s). Several cushioned primary receptacles may be placed in one secondary packaging. There must be sufficient additional absorbent material used in the secondary packaging to absorb all fluid in case of breakage.
Outer packaging
This shipping packaging holds the secondary packaging(s). Be sure to include suitable cushioning material. The outer packaging protects contents from outside influences and physical damage while in transit. The outer packaging should be no smaller than 10x10 cm.
If triple packaging is not available, prepare the samples according to the International Dangerous Good Transportation Rules. For more information about this or other aspects of triple packaging, see the International Air Transport Association (IATA) shipping guidelines. It provide details about definitions, packaging requirements, markings and labels, accompanying documentation, notification protocols, and refrigerants.
-
Reading: Reasons for Rejection of Whole Blood Samples (5 min)
To minimise delays in getting the lab results and to prevent having to redraw blood samples unnecessarily, it’s important that we follow proper procedures when collecting, storing, and packaging/transporting the samples. Samples will be rejected for the following reasons:
- Insufficient volume in tubes < 4 mL
- Wrong tube
- Clotted specimen
- Hemolysed sample (not using vacutainer)
- Old sample
- Leaking specimens
- Missing specimens or forms
- Missing patient data (e.g., name, age, sex)
-
Case Study: Isaac (15 min)
In session 1 we met Isaac, a 39-year-old farmer who tested positive for HIV. At the last visit, he seemed angrier, and you thought you smelled alcohol on his breath. He left the last visit visibly upset and agreed to come back on time for his next appointment if future visits can be every other month.
Unfortunately, Isaac doesn’t return for his scheduled appointment. Three days later (after the holiday weekend), he shows up before the clinic opened. He tells you that his family came to visit and he was busy at the farm. He reports that he didn’t miss any doses since he has extra pills left over from previous months. He’s anxious to get his pills and blood work quickly so he can get to work. You remind him that he’ll have to come back in one month to receive his VL results and if that shows his medication is working, he can have a two-month supply of medication. He reluctantly agrees, repeating that coming to clinic every month is a problem.
We’ll continue with Isaac’s story in session 3.
-
Reading: Summary (5 min)
This concludes session 2. In this section, we discussed the importance of following proper sample collection procedures, which serve as the first step in VL monitoring. We watched a video that covered the steps to follow when using venipuncture to collect blood from a client. We also learned about how to correctly complete the VL laboratory request form. We then went into detail describing and comparing the two methods of VL sample collection — plasma and DBS. We discussed proper procedures to follow for both types of collection methods and which type of tube to use (EDTA, PPT, or DBS) depending on how far away the testing laboratory is from your facility. We also learned why samples will be rejected. This section wrapped up with an overview of triple packaging methods to use for preparing samples for transportation.
-
Quiz: Post Test (10 min)