 If you want, you can
open PWAC's site in a second page.
If you want, you can
open PWAC's site in a second page.
The steps below should work well on a PC or a MAC, though the screens will look a little different.
(And if you use Safari, you'll find your Download folder next to the trash can.)
If you want, you can
open PWAC's site in a second page.
Enter your UW NetID followed by "@uw.edu".
(For example: I would enter "weller@uw.edu".)
Click "Next" and enter your password.
Finally, confirm your identity with Duo Mobile. Tip: If you're on a computer you normally use, ask Duo Mobile to remember your browser to bypass this step next time.
Once you reach the site, you might bookmark it (Ctrl-D) for future reference.
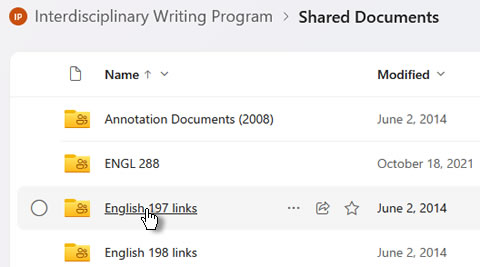 Once you've logged on, you'll see PWAC's shared documents.
Open a folder by clicking its name.
Make sure the name is underscored. If you click the folder icon or the radio button to its left, you'll select the folder, rather than open it.
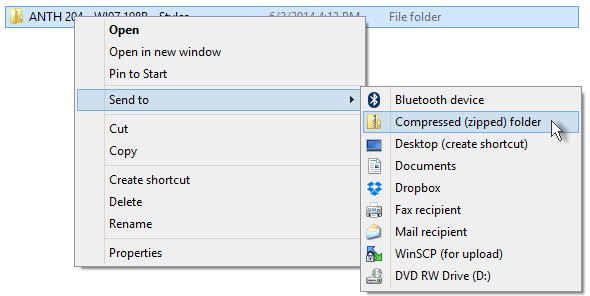 The quickest way to add a set of files is to archive them as a ZIP file.
On a PC, you can use the "Send to" menu to compress an entire folder.
The quickest way to add a set of files is to archive them as a ZIP file.
On a PC, you can use the "Send to" menu to compress an entire folder.
In the screen shot to the right, I've RIGHT-clicked a folder, then clicked "Send to" to reach "Compressed (zipped)". Once I click "Compressed," Windows will create the ZIP file.
The ZIP file will include everything stored in the original folder. (7-zip is a good, free utility for creating ZIP files, too.)
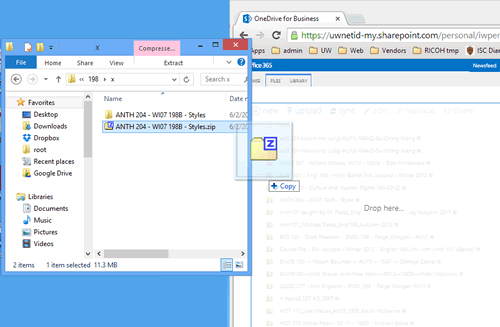 Once you have a ZIP file, you can add it to the site in 2 ways:
You can drag it onto the site.
To the right is a snapshot I took of the screen as I dragged a file onto the webpage. Once "Drop here" appears on the page, I can release the mouse button to start uploading the file.
If I need to cancel dragging, I can tap the "Esc" key. Or I can drag the file back to its original folder before releasing the mouse button.
You can use the "upload" link near the top of the page, if you prefer, and browse to your file.
A large ZIP file might require a couple of minutes to arrive. Don't navigate away from the page until the upload is complete; otherwise, you'll need to upload, again.
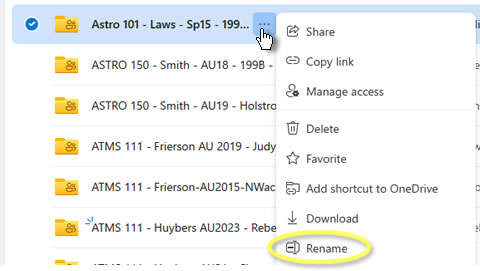 Hover over the filename and click the 3 dots that will appear to reach other actions you can perform on the file.
You'll find Rename and Delete in the pop-up menu.
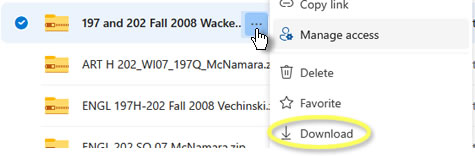 Same as above, hover over the file and click the 3 dots. Download is among the list of actions.
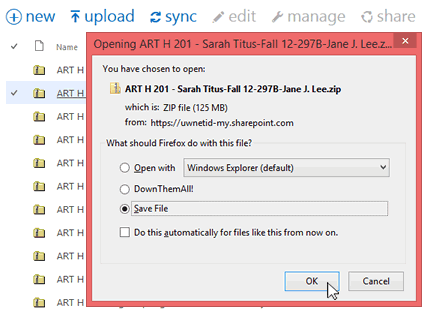 Save the document to your "Downloads" folder by selecting "Save File" and clicking OK.
You can now reach the file by opening your browser's download manager (Ctrl-J), or by navigating to the "Downloads" folder in your user profile.
To view the contents of a ZIP file, double-click it.
Note: this doesn't expand the files to their original state. To work with the files normally, extract them from the archive.
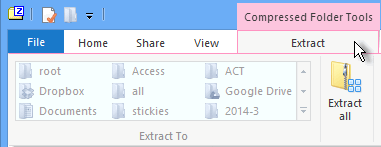 To extract the contents of a ZIP file, use the "Extract" option (in Windows Explorer). 7-zip is great alternative for this, too.
You can extract selected files, or all of them. (Try Ctrl-Click to select multiple individual files, or Ctrl-A to select all.)
You can delete the original ZIP file after extracting its files.
 As above, hover over the filename and click the 3 dots to reach the Download option.
Downloading the file makes a local copy on your computer.
Changes you make to this file are not reflected online.
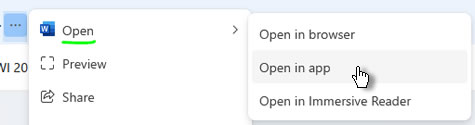 If you want to edit a file you've already uploaded (for instance, to fix a typo) hover and click the 3 dots.
Then click Open at the top of the pop-up window.
If you want to edit a file you've already uploaded (for instance, to fix a typo) hover and click the 3 dots.
Then click Open at the top of the pop-up window.
"Open in app" launches your local copy of Word to edit the file. This will have a richer set of editing options.
"Open in browser" allows you to edit w/out a local copy of Word available.
Either option automatically saves the file online as you work, so others can see your changes right away.