Using On-line Protocols
RADIOLOGISTS
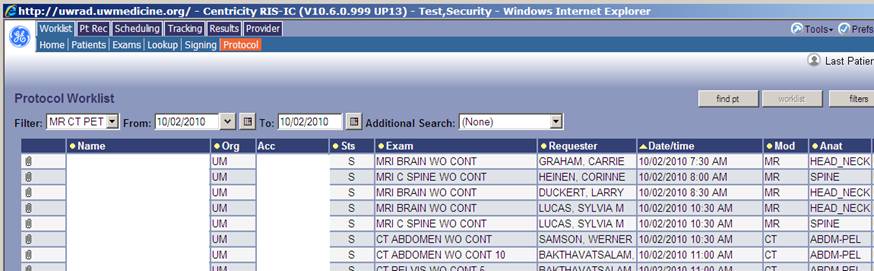
To use on-line protocols, go to the Protocol Worklist. (First time users, see instructions for setting up your filters.)
1. The paperclip is an icon noting a scanned document exists. It is not a link. To see the document, open the Clinical Info Window (#3) and click the paperclip at the top.
If you are auto-launching documents, make sure the ACC number on the requisition matches the ACC number of the exam. (See instructions under Set up to Autolaunch Documents.)2. The Name hyperlink shows you today’s exams for the patient. Protocols, except for add ons, are done at least 24 hours in advance. This link shows you current day exams only, regardless of the date you are protocoling.
3. The Accession number hyperlink takes you to the Protocol window.
4. The Exam hyperlink connects you the the Enter/Edit window where you can change the exam code. Also use this to add a modifier when you need the exam to switch worklists. (See instructions for Switching an Exam to a Different Worklist.)
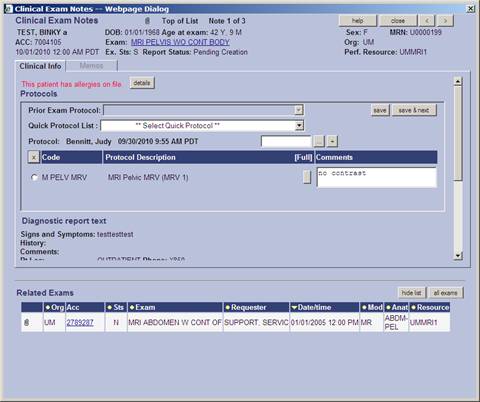
To protocol an exam click the accession number hyperlink, which opens the Clinical Exam Notes window.
1. Prior Exam Protocol will display and can be selected for the current exam if desired.
2. Quick protocol is a list of exams frequently selected for this exam.
3. The look up button below the quick list will show you all protocols.
NEURO protocols begin with N, followed by the modality (C or M), then the body part (SP = spine, H= head…)
MSK protocols are numbered and match what is used at HMC.
BODY is using their current protocol list.
4. Comments should include information the tech needs to scan outside the standard protocol, e.g. additional sequences, contrast, delay scan times.
5. Once the protocol is done,
to return to the worklist or .
to protocol the next exam.
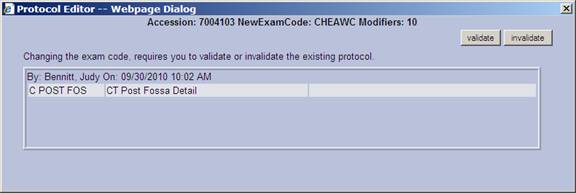
CHANGING THE EXAM CODE FROM THE PROTOCOL WORKLIST:
1. Click the Exam hyperlink (goes to Enter/Edit Exam.)
2. Use the exam look up to select the correct exam code
3. Click save.
4. If you edited the exam code for an exam with protocol instructions, a window displays the existing protocol instructions and prompts you to validate them. Do one of the following:
§ Click validate to retain the existing protocol.
§ Click invalidate to delete it. The existing protocol instructions are removed. The exam returns to the Protocol Worklist.
· You can see which protocol was assigned on the Clinical Exam Notes window when you open an exam to dictate. Correct if necessary. Information from that protocol will pull into your report.
· Rescheduling the exam without changing the exam code does NOT disconnect the protocol.
· Exams that have an assigned protocol are identified on the worklists with a checkmark.
SWITCHING THE EXAM TO A DIFFERENT WORKLIST:
Sub Specialty allows you to move exams from one list to another. This works for the Exams Worklist as well as Protocols.
- Select the Exam hyperlink to go to the Enter/Edit window.
- Click the ellipsis
by the first blank Exam Modifier field.
- Select the desired Worklist modifier from the pop-up list.
Your exam will move to the selected modality’s worklist.
SETTING UP A FILTER FOR PROTOCOLS:
The first time you select the Protocols Worklist, you will get this pop-up:
The date range needs to be 7 days to cover weekends.
Exclude Existing:
- If you want to see exams with protocols, this should say “No”.
- To have protocoled exams drop off the list, this should say “Yes”.
Enter the organization you want to view. (RR, UM, SC, SO) (leave blank for all)
Enter the Sub-Specialty: (MSK, Body, Neuro)
Save and Name.
You can make as many filters as you want. You can also
filters.
SET UP TO AUTOLAUNCH DOCUMENTS FROM THE PAPERCLIP
1. Open User Preferences ( the “Prefs” window where you set up your reporting preferences)
2. On the General Tab, scroll down to “Document Management”.
3. Check “Auto launch documents from Paperclip”.