Difference between revisions of "Psychophysics"
(→Introduction) |
(→Version 3) |
||
| (28 intermediate revisions by 3 users not shown) | |||
| Line 4: | Line 4: | ||
# Ensure that Linux system is ready - with Chin Rest set-up | # Ensure that Linux system is ready - with Chin Rest set-up | ||
# Perform Vision Test | # Perform Vision Test | ||
| − | + | Open Terminal. Type "sudo ptb3-matlab", then enter the password. | |
| + | MatLab will load. Navigate to the Code directory | ||
cd /.../code | cd /.../code | ||
| − | Ensure the script shows the correct monitor "CHDD" | + | Ensure the script shows the correct monitor "CHDD" and the subject number is correct. |
===Introduction=== | ===Introduction=== | ||
| − | In this | + | In this task you are going to play a game, and your goal is to win as many points as possible. This game is a vision game and will test your powers of attention and detection. |
| − | [[File: | + | |
| − | When you're playing the game, you're going to rest your chin here, and focus on the + in the middle of the screen. | + | ===Introduce the Single Stimulus=== |
| − | + | The first part of the game looks like this: | |
| − | *During demonstration, use your hand to show the tilt of the | + | [[File:SingleStim3.jpg|800px]] |
| − | + | The stripe patch is going to flash on the screen in one of eight spots around the screen and your job is to say which way the stripes are tilted by pressing the correct button on the keyboard. If they are tilted like this* towards this* corner of the screen, press the Left arrow. | |
| − | + | If they are tilted like this* towards the other corner of the screen, press the Right arrow instead. | |
| − | + | [[File:singleSmallTilt2.jpg|800px]] | |
| − | [[File:Gabors2.jpg]] | + | When you're playing the game, you're going to rest your chin here, and focus on the + in the middle of the screen. |
| − | It doesn't matter which side of the screen the | + | *During demonstration, use your hand to show the tilt of the stripes, pointing them toward the corners of the monitor, avoiding descriptions of Left or Right, or Clockwise or Counter-Clockwise |
| − | It may seem easy now, but the tricky part of the task is that it gets harder and harder to tell which way the | + | It doesn't matter where the patch of stripes is located on the screen, it only matters which way the stripes are tilted. |
| − | [[File:SmallTilt.jpg]] | + | If you get it right, you will hear a short ding and see a +3 in green at the center of the screen. This is what it looks like: |
| − | + | [[File:FeedbackPointsCorrect.jpg|800px]] | |
| − | + | If you get it wrong, you will hear a different sound and +0 in the middle of the screen in red. | |
| − | + | [[File:FeedbackPointsError.jpg|800px]] | |
| − | + | Any questions? Ready to try a practice round of this part? | |
| + | |||
| + | ===Practice Single Stimulus=== | ||
| + | Follow embedded instructions, specifying that it is practice [y], the single stimulus version [2], the shorter version [n], and initialize the tilt level in degrees [ex. 30] | ||
| + | NOTE: If you need to exit the task at any time, press the 'Q' key instead of a Left/Right Arrow response | ||
| + | |||
| + | ===Uncued task=== | ||
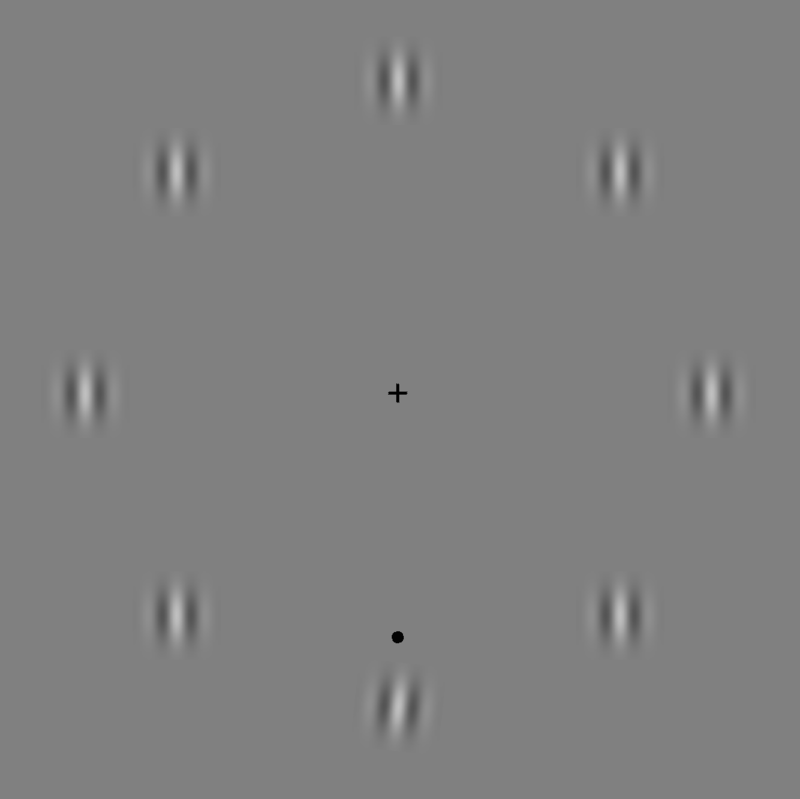
| + | In the last part, we make it a bit harder and get rid of that red dot. In this task, your task will be to pay close attention to all of the stripes and find which one is tilted and press the correct button. | ||
| + | In this one, it will be especially important to keep your eyes fixed on that +, so that you can see all of the patches, since you don't know which one is going to be different. | ||
| + | This is what they look like? | ||
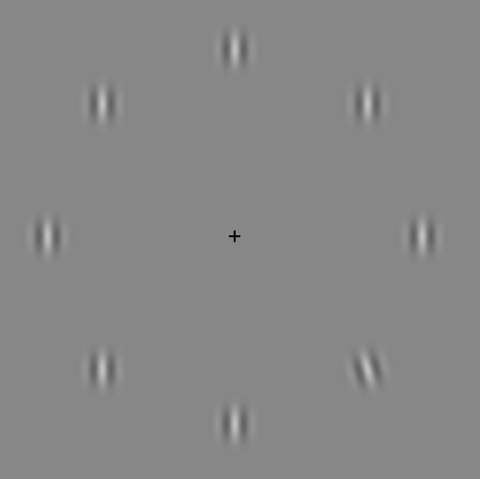
| + | [[File:GaborsCloseUp.jpg|800px]] | ||
| + | As you can see all eight of the stripes are the same except for one. | ||
| + | [[File:Gabors2.jpg|800px]] | ||
| + | It doesn't matter which side of the screen the tilted stripes are on, so even if they are on the right side of the screen, you would still press the Left Arrow since the tops of the stripes are pointing toward the Left Corner of the Monitor. | ||
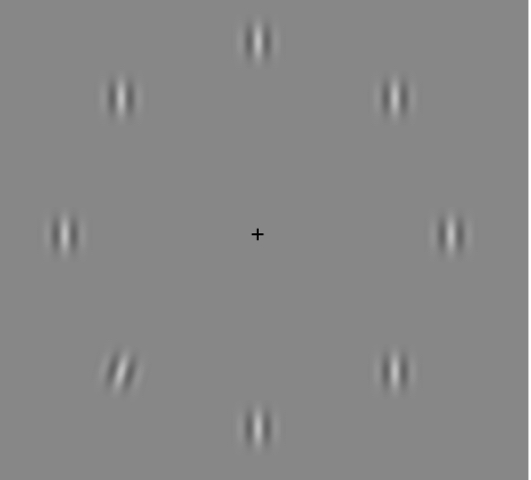
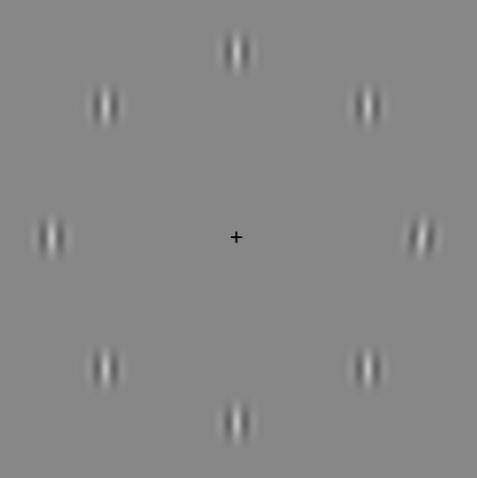
| + | It may seem easy now, but the tricky part of the task is that it gets harder and harder to tell which way the stripes are tilted, to the point that you have to pay extra close attention. Which one is different in this picture? | ||
| + | [[File:SmallTilt.jpg|800px]] | ||
===Uncued Practice=== | ===Uncued Practice=== | ||
Run CueingDL1.m | Run CueingDL1.m | ||
| − | Follow embedded instructions, specifying that it is practice [y], the uncued version [0], the long version [y], and | + | Follow embedded instructions, specifying that it is practice [y], the uncued version [0], the long version [y], and initialize the tilt level in degrees [ex. 30] |
NOTE: If you need to exit the task at any time, press the 'Q' key instead of a Left/Right Arrow response | NOTE: If you need to exit the task at any time, press the 'Q' key instead of a Left/Right Arrow response | ||
| − | |||
===Introduce the Cued task=== | ===Introduce the Cued task=== | ||
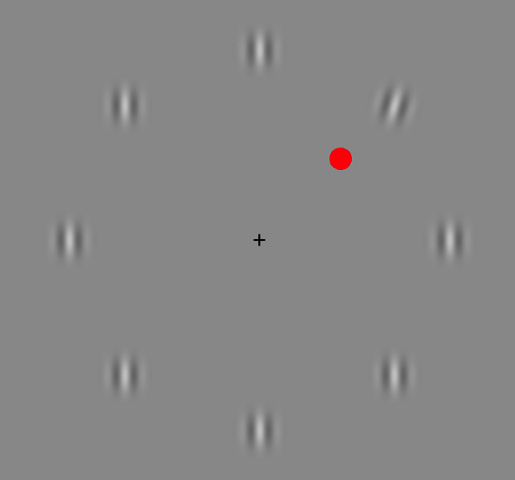
| − | In the second task, we're going to | + | In the second task, we're going to make it a bit harder. This time there will be 8 of those stripe patches, arranged in a circle and all of them will be the same except one. In this game, we help you out and show a red dot next to the one that will be tilted. |
| + | Your job will be to find that red dot, see the stripes that are tilted, and press the correct button. It's important to note that in this game the red dot will ALWAYS be next to the stripes that are tilted and will appear just a split-second before the stripe patches. | ||
This is what it will look like: | This is what it will look like: | ||
| − | [[File: | + | [[File:CuedGabor.jpg|800px]] |
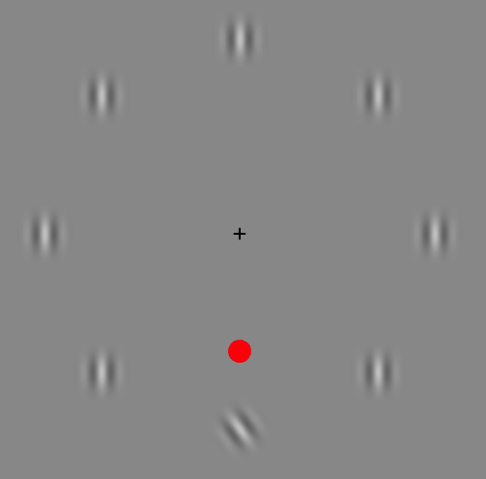
Or this: | Or this: | ||
| − | [[File: | + | [[File:CuedGabor2.jpg|800px]] |
Let's practice this version! | Let's practice this version! | ||
Remember to keep you chin on the rest, and focus on that +! | Remember to keep you chin on the rest, and focus on that +! | ||
===Cued Practice=== | ===Cued Practice=== | ||
| − | + | Continue embedded instructions, specifying that it is another practice [y], the cued version [1], the long/short version, and initialize the tilt level in degrees [ex. 30] | |
| − | + | ||
| − | + | ||
| − | + | ||
| − | + | ||
| − | + | ||
| − | + | ||
| − | + | ||
| − | + | ||
| − | + | ||
| − | + | ||
| − | + | ||
| − | + | ||
| − | + | ||
NOTE: If you need to exit the task at any time, press the 'Q' key instead of a Left/Right Arrow response | NOTE: If you need to exit the task at any time, press the 'Q' key instead of a Left/Right Arrow response | ||
| Line 61: | Line 64: | ||
Regardless, at minimum, the subject should perform the uncued task with an initial tilt level at 15 or below. | Regardless, at minimum, the subject should perform the uncued task with an initial tilt level at 15 or below. | ||
Run a few iterations of the practice rounds, at short duration. | Run a few iterations of the practice rounds, at short duration. | ||
| + | |||
| + | ===Block Series=== | ||
| + | Now that you're done with the practice and proven yourself an expert, lets put those skills to the test. In the real game, you will play the different tasks in this order: single path, uncued, cued, uncued, cued, single patch. Each game is going to have more of each task and we're going to add a feature to make it a bit harder. | ||
| + | This game is designed so that every time you get the right answer, the next one is going to be a bit harder by making the tilt harder and harder to see*. | ||
| + | *demonstrate with your hand that the tilt angle will get progressively shallower. | ||
| + | The game works the opposite way too - if you get one wrong, the next one is going to be a bit easier. | ||
| + | You might have noticed that when you were doing the practice every time you got a correct answer you saw a +3 in the middle of the screen, and every time you got it wrong you got a +0. In the practice the points didn't matter, but now that we're starting the real game, the challenge is to see how many points you can get! | ||
| + | To win the game, you need to get more than 700 points! | ||
| + | The stripe patches show up quickly, but this is not a game of speed! You can take your time and there's no rush to respond. Don't take too long though - you might forget what you saw! | ||
| + | <br> | ||
| + | Remember, keep your chin on the rest and focus hard on that + in the middle of the screen to give your eyes the best chance of detecting which stripes are not like the others! | ||
===Run the Series=== | ===Run the Series=== | ||
| Line 66: | Line 80: | ||
Run CueingDL1.m | Run CueingDL1.m | ||
Follow embedded instruction, specifying that it is NOT practice [n] and set the threshold level at a level based on the performance during practice - somewhere in the range of 15-20 should be ideal. | Follow embedded instruction, specifying that it is NOT practice [n] and set the threshold level at a level based on the performance during practice - somewhere in the range of 15-20 should be ideal. | ||
| + | |||
| + | ===Version 3=== | ||
| + | In version 3, there are now 8 blocks: 2 single stimulus, 2 uncued, 2 with a red cue, and 2 with a small black R&H cue. | ||
| + | This is what the small black R&H cue looks like: | ||
| + | [[File:V3SmCueBotCrop.png |800px]] | ||
Latest revision as of 22:47, 6 June 2016
Contents
Attention: Spatial Cueing
Spatial Cueing testing takes place in CHDD in Room 370
# Ensure that Linux system is ready - with Chin Rest set-up
# Perform Vision Test
Open Terminal. Type "sudo ptb3-matlab", then enter the password.
MatLab will load.  Navigate to the Code directory
  cd /.../code
Ensure the script shows the correct monitor "CHDD" and the subject number is correct.
Introduction
In this task you are going to play a game, and your goal is to win as many points as possible. This game is a vision game and will test your powers of attention and detection.
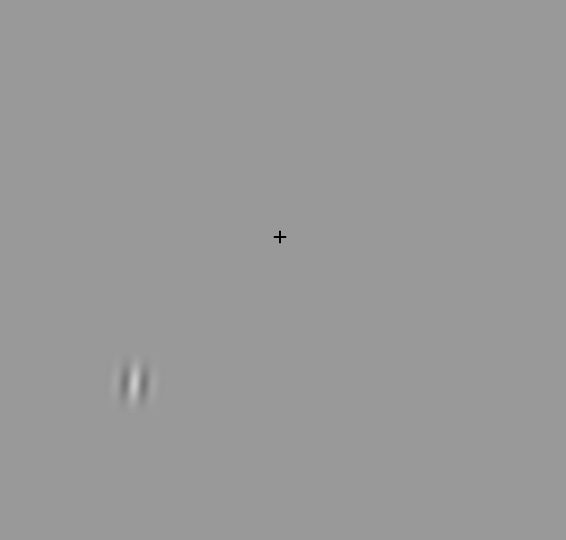
Introduce the Single Stimulus
The first part of the game looks like this:
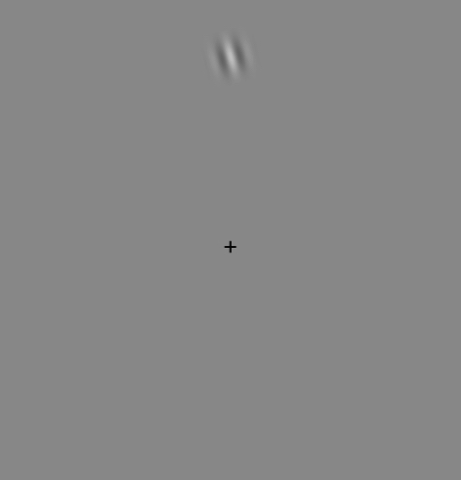

The stripe patch is going to flash on the screen in one of eight spots around the screen and your job is to say which way the stripes are tilted by pressing the correct button on the keyboard. If they are tilted like this* towards this* corner of the screen, press the Left arrow. If they are tilted like this* towards the other corner of the screen, press the Right arrow instead.

When you're playing the game, you're going to rest your chin here, and focus on the + in the middle of the screen.
- During demonstration, use your hand to show the tilt of the stripes, pointing them toward the corners of the monitor, avoiding descriptions of Left or Right, or Clockwise or Counter-Clockwise
It doesn't matter where the patch of stripes is located on the screen, it only matters which way the stripes are tilted. If you get it right, you will hear a short ding and see a +3 in green at the center of the screen. This is what it looks like:


If you get it wrong, you will hear a different sound and +0 in the middle of the screen in red.


Any questions? Ready to try a practice round of this part?
Practice Single Stimulus
Follow embedded instructions, specifying that it is practice [y], the single stimulus version [2], the shorter version [n], and initialize the tilt level in degrees [ex. 30]
NOTE: If you need to exit the task at any time, press the 'Q' key instead of a Left/Right Arrow response
Uncued task
In the last part, we make it a bit harder and get rid of that red dot. In this task, your task will be to pay close attention to all of the stripes and find which one is tilted and press the correct button. In this one, it will be especially important to keep your eyes fixed on that +, so that you can see all of the patches, since you don't know which one is going to be different. This is what they look like?

As you can see all eight of the stripes are the same except for one.

It doesn't matter which side of the screen the tilted stripes are on, so even if they are on the right side of the screen, you would still press the Left Arrow since the tops of the stripes are pointing toward the Left Corner of the Monitor. It may seem easy now, but the tricky part of the task is that it gets harder and harder to tell which way the stripes are tilted, to the point that you have to pay extra close attention. Which one is different in this picture?

Uncued Practice
Run CueingDL1.m
Follow embedded instructions, specifying that it is practice [y], the uncued version [0], the long version [y], and initialize the tilt level in degrees [ex. 30]
NOTE: If you need to exit the task at any time, press the 'Q' key instead of a Left/Right Arrow response
Introduce the Cued task
In the second task, we're going to make it a bit harder. This time there will be 8 of those stripe patches, arranged in a circle and all of them will be the same except one. In this game, we help you out and show a red dot next to the one that will be tilted. Your job will be to find that red dot, see the stripes that are tilted, and press the correct button. It's important to note that in this game the red dot will ALWAYS be next to the stripes that are tilted and will appear just a split-second before the stripe patches. This is what it will look like:

Or this:

Let's practice this version! Remember to keep you chin on the rest, and focus on that +!
Cued Practice
Continue embedded instructions, specifying that it is another practice [y], the cued version [1], the long/short version, and initialize the tilt level in degrees [ex. 30]
NOTE: If you need to exit the task at any time, press the 'Q' key instead of a Left/Right Arrow response
Additional Practice
This is a subjective decision following the above practice to add additional practice rounds based on how the subject is feeling and performing on each stimulus type. Regardless, at minimum, the subject should perform the uncued task with an initial tilt level at 15 or below. Run a few iterations of the practice rounds, at short duration.
Block Series
Now that you're done with the practice and proven yourself an expert, lets put those skills to the test. In the real game, you will play the different tasks in this order: single path, uncued, cued, uncued, cued, single patch. Each game is going to have more of each task and we're going to add a feature to make it a bit harder. This game is designed so that every time you get the right answer, the next one is going to be a bit harder by making the tilt harder and harder to see*.
- demonstrate with your hand that the tilt angle will get progressively shallower.
The game works the opposite way too - if you get one wrong, the next one is going to be a bit easier.
You might have noticed that when you were doing the practice every time you got a correct answer you saw a +3 in the middle of the screen, and every time you got it wrong you got a +0. In the practice the points didn't matter, but now that we're starting the real game, the challenge is to see how many points you can get!
To win the game, you need to get more than 700 points!
The stripe patches show up quickly, but this is not a game of speed! You can take your time and there's no rush to respond. Don't take too long though - you might forget what you saw!
Remember, keep your chin on the rest and focus hard on that + in the middle of the screen to give your eyes the best chance of detecting which stripes are not like the others!
Run the Series
Determine in script the number of blocks.
Run CueingDL1.m
Follow embedded instruction, specifying that it is NOT practice [n] and set the threshold level at a level based on the performance during practice - somewhere in the range of 15-20 should be ideal.
Version 3
In version 3, there are now 8 blocks: 2 single stimulus, 2 uncued, 2 with a red cue, and 2 with a small black R&H cue. This is what the small black R&H cue looks like: