| |
|
|
| |
|
| |
|
Components
|
|
|
|
The following vegetative slope stabilization techniques will
be discussed in this section:
seeding, container or bare root planting, live staking, contour
wattling, and brush layering.
|
|
|
|
Seeding
Seeding involves the application of grass, forb, and woody plant
seed mixes to areas with slope. This process creates a shallow
fibrous rooting zone in the upper foot of the surface profile
that binds surface soils and protects soil surfaces from water
runoff, wind, and freeze-thaw erosion. Seeding is typically combined
with other planting techniques for most erosion control issues.
Seeds can be applied to slopes either by hand broadcasting or
placing seeds into small holes along the slope.
Broadcast seeding is the most common technique used in projects.
This type of application is fast and effective is the slope soil
has been roughened slightly and mulch added to prevent desiccation
and wind transport. Hydro seeding takes this technique a step
further in the application process and combines seed, water, fertilizer,
and mulch into one mixture. Applying a hydro seed mix is useful
in hard to reach areas and along expansive slope faces. Drilling
soil holes is a slower process but reduces the seed quantities
required. This method is best used on mild slopes, in smaller
areas, and for woody plant seed stock. The soil hole is typically
3 inches in diameter by 4 inches deep. After dropping a slow release
fertilizer capsule into the hole, 3 ½ inches of soil is
placed above followed by about 20 seeds. Once this is done the
hole can be covered according to the seed supplier.
|
|
|
|
|
|
|
|
A few limitations and disadvantages exist
with this method of erosion control. Seeding is good for mild erosion
problems considering that the shallow fine rooting systems of grasses
and forbs do not significantly increase the shear strength of the
soil profile. Seeding also requires constant soil moisture for germination.
|
|
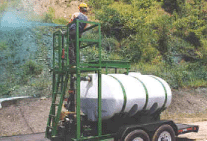
Figure 1:
Hydro seeding mixture spray application
|
|
A few limitations and disadvantages exist
with this method of erosion control. Seeding is good for mild
erosion problems considering that the shallow fine rooting systems
of grasses and forbs do not significantly increase the shear strength
of the soil profile. Seeding also requires constant soil moisture
for germination.
|
|
Container or Bare Root Planting
Container and bare root planting involves
placing single or bunches of rooted plants into holes along the
slope. This technique is typically used for woody plants or for
non-woody plants that will over time develop a uniform root coverage.
A good practice is to use transplants from nearby areas to keep
a consistent vegetation scheme. Using rooted plant materials avoids
the critical germination period for seeding or root development
period for cuttings.
|
|
|
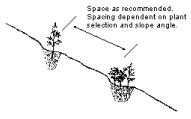
Figure 2: Container/ bare root planting (single
or bunch planting).
|
|
During the fall or spring place loosened
root balls into holes making sure that roots are
not bound or bent upwards. Pruning plants after installation allows
a greater percentage of available plant energy to be used for
a healthy rooting system. To ensure fast stabilization results,
it is a good idea to use plant groupings or bunch plantings with
slightly different rooting and foliage characteristics. Bunch
planting also allows slope suitable plants to dominate the plant
community over time. Mulching around all plants is recommended
as a minimum.
Limitations to these methods are few. Container
planting does not apply to gully erosion problems. Container plants
can also be relatively expensive and hard to install into some
mulching systems. This technique also requires an initial watering
regime.
|
| |
| Live Staking
Live stakes are sections of woody plants
cut into segments and placed into the slope. The plant materials
used for stakes are usually hardy species that can root easily to
eventually grow into mature woody shrubs that reinforce the soil.
Stakes should be installed during the fall or spring depending on
when the original plant is dormant.
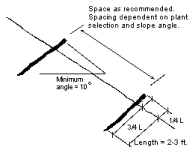
Live stakes are generally 2 to 3 feet long
and ½ to 1 ½ inches in diameter. Stakes should be
flat cut on the top and diagonal cut on the bottom to be installed
correctly. This stabilization method can be used alone or with other
planting techniques. If used along, stake should be spaced across
the slope according to species recommendations. Each row should
have stakes above or below one another in a diamond pattern. Positioning
the stake at a horizontal angle to encourage root growth along the
entire below ground length.
|
 |
Stake should be gently taped into predrilled holes
which are slightly smaller than the diameter of the stake. If damaged,
the top section of the stakes should be removed. Mulching is a good
practice after installation is complete. Live staking can be used
with contour wattling to secure wattles along a slope. |
| |
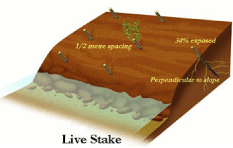
| Figure 3: Live
stake strategically placed on stream bank |
| |
 |
Staking should only be used on
slopes of 1.5’ horizontal to 1’ vertical. Planting
during the summer and early fall can result in low propagation
and poor slope protection performance of the vegetation system.
This method does not produce immediate stabilization results
and does not solve existing erosion problems. |
| Figure 4: Live staking |
|
|
| |
| Contour Wattling
Contour wattling is a method that
can be used to stabilize shallow soil structure against landsliding.
This technique involves packing lengths of woody plant material
into cables or bundles (also called live fascines). These bundles
are typically 8 to 10 inches in diameter and are laid continuously
along slope contours. Cabling along the slope helps to intercept
surface water runoff by routing it laterally before erosion occurs.
Wattles help trap sediment by creating barriers that protect down
slope areas against material falls or erosion.
|
| |
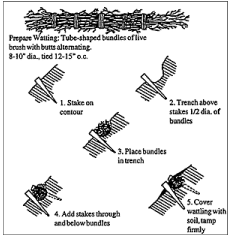 |
Willow, red-osier dogwood, and
snowberry are woody plants suitable to contour wattling. This
technique is good for slopes of 1.5’ horizontal to 1’
vertical or less. Wattles are placed in shallow trenches horizontally
along the slope at a single contour elevation. Installation
along a slope face should progress from the slope toe upslope
to the crest until planting is complete. |
| Figure 5: Contour wattling
details and layout steps |
|
| Wattles are created by
layering individual plant material about ½ to 1 ½
inches in diameter and about 4 to 8 feet long altogether creating
8 to 10 inches wide bundle. These bundles are tied together
with twine until the length of the contour is covered. Live
staking the down slope side of the trenches holds the wattles
in the trench overlapping the ends of the bundles. A 2 foot
long section of a 2x4 should be staked through the wattles every
two feet. The remaining soil from the trench excavation is finally
compacted into the trench leaving about 80% of the wattle buried
below the soil surface.
|
 |
Although this is a good erosion control technique,
there is a significant quantity of plant material required thus resulting
in a labor crew of 3 to 4 people. On steep or long slope lengths,
runoff can undercut wattlings and they can dry out if not properly
installed, covered, or maintained. |
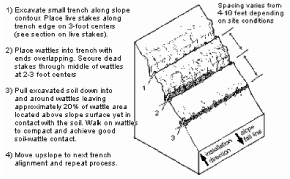
| Brush Layering
Brush layer planting consists of live
woody plant material placed into the slope face along trenches in
the slope contours. This method is most suitable in highly disturbed
or eroded cut and fill situations. Layering achieves soil reinforcement
that resists potential shallow-seated landsliding. Brush layers
capture debris moving down slope.
|
| |
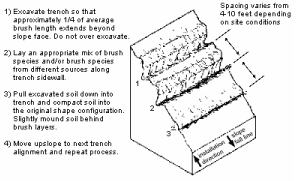 |
Installation should be done in
phases to reduce the chance of soil movement and limiting the
removal of soil. This approach is applicable in areas where
large quantities of loosened soil exist on the slope and if
imported soil material will be used. Brush layer should be used
on slope up to 1.5’ horizontal to 1’ vertical or
in highly eroded gully areas. |
| Figure 7: Detail of brush
layering in contour wattling |
|
| |
|
|
 |
Brush layering is not good for dense soil
structures and should only be used on gully erosion in specific
situations. This technique is labor intensive and is intolerant
to development of water channels. |
| Figure 8: Brush layer
section |
|
| |
|
|
| |
| |
| |
|
|
|
| |
|
|
|