
CIC Faculty Guide Online
CommonView
Creating a Course Website with CommonView
CommonView allows you to create and publish a course Web site—or “Workspace” in
CommonView’s language—by typing information into a template and
uploading files. CommonView translates your text into HTML coding and publishes
your pages to the web with the click of a button. CommonView can be the central "go
to" place for all of the resources and tools that students will need for
your course.
Some of the features for a course website include:
- Easy integration of other Catalyst tools: Commonview makes it easy to link to other course tools such as Go Post and Collect It so that students can find everything they need for a course in one place.
- Easy organization of course documents and readings: Commonview makes it easy to create a page for course readings (either Word or pdf docs) or for other class documents, such as syllabi and assignment sheets. Students will appreciate having all of these resources in one place and accessible at any time.
- An updatable course announcement function: Homework assignments and other course announcements can be posted in a time-stamped announcements sidebar.
- Easy creation of links to course resources: CommonView makes it easy to create a resource of course links important to the course.
- Efficient management of the site: CommonView makes it easy to duplicate information on multiple pages, and to reorder it as often as necessary. CommonView also allows you to hide resources on the site until they are relevant to the course. This means that you can prepare the whole site in advance of the course yet only reveal pieces of it as they become relevant to students.
- Simple and clean or sophisticated visual appeal: By simply adding Catalyst tools and uploading documents, CommonView will create a clean and accessible course website for you. The rich text editor, however, enables the savvier and more ambitious instructor to integrate images, YouTube videos, calendars and HTML coding into the site.
- Choice regarding participant access: Like other Catalyst tools, you can choose whether you would like access to your site limited to students enrolled in your class, to anyone with a UW NetID, or to anyone on the web.
The CommonView course home page pictured below is an example of the most straightforward approach to building a site. The Calvin and Hobbes cartoon is an image file uploaded via the rich text editor. Links to course Catalyst tools--the welcome survey and assignment dropbox--were created by selecting Add Catalyst tool from the Add content drop-down menu. The announcements box reminds students of important due dates and appears on every page of the site. The colored sidebar on the left side is a menu of the site's other pages, or "Views" in CommonView's language. To create a new page, the user simply chooses Add a new view. The home page image below depicts the owner's view, so the drop-down menus and icons (the pen, the rabbit in the hat and the "X") that enable making changes to the page are visible. Students viewing the page will not see these elements.

![]()
Getting Started with CommonView
Creating a New CommonView Site
-
Go to the Catalyst Web site.
-
Select “Web Tools Login” from the top of the welcome page and enter your UW Net ID and password when prompted. If you have never used a Catalyst tool before, you will be prompted to enter your name and other information.
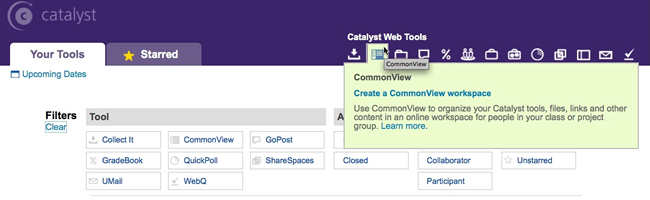
- Once you have logged in, your account page will appear. In the Catalyst
Web Tools icon bar on the top right of the page, click on the CommonView
icon. In the dialogue box that opens, click on Create a CommonView
workspace.
- You will be prompted to name your workspace. Choose a name that students will easily recognize as your course. They may have more than one CommonView site in their Catalyst accounts.
- Now you are ready to begin building your site. You will see that instructions are embedded within the "workspace" template. The Catalyst CommonView Help Center also has detailed instructions for how to create and manage your site. The menu is copied at the bottom of this section with active links to each topic.
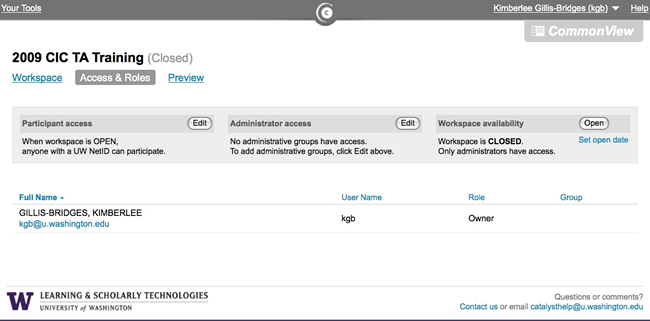
- Your students will not be able to access
the site until you have set
participant access and opened the workspace's
availability. To complete both of these functions go to the Access &
Roles menu underneath the title of your workspace. A screen
like the one pictured below will open.
Choose edit in the Participant Access box to set the desired level of access (general public, anyone with a UW NedID or to your class only). Choose open in the Workspace availability box to "publish" your site.
Although Common View was designed to help instructors author course web sites, you may use the tool for other purposes:
- As a tool to teach public writing: Workspace availability can be set so that it can be catalogued by internet seach engines and accessed by anybody. As such, CommonView provides a tablet for students to write for the web and to learn about the benefits and constraints of writing in a public space. Students can generate their own individual sites, or contribute to a class site.
- As a portfolio tool: CommonView affords many of the same functions as Catalyst's Portfolio tool for collecting course work and providing space for reflective writing. Students can upload coursework artifacts (documents, photos, videos, etc.) and juxtapose those with blocks of reflective text composed in the rich-text editor. It is easier for students to upload images and to design the pages of a portfolio using CommonView than with Catalyst's Portfolio tool. However, CommonView does not allow instructors to create portfolio templates for distribution to students.
![]()
Sample CommonView Sites
Sample Course Sites
- English 281: The Rhetoric of Writing in the Workplace
This is an example of a basic course website that collects together course Catalyst Tools, documents, and other resources.
Other Sample Sites
- CIC
TA Training CommonView Site
This is the site used in CIC training to distribute matierals to trainees and to demonstrate the use of CommonView.
![]()
Additional Resources
- Catalyst CommonView Help Center
Go here for the how-to documentation provided by the creators of the tool.
![]()