|
 |
|
|
The parameter files used to define block-detector-based tomographs can be very long. We provide MatLab scripts to simplify creating two of the files, the block and ring parameter files. These scripts prompt the user for parameters needed. In some cases the scripts can calculate some parameters, for instance the angular positions of blocks within a ring if the blocks are evenly distributed around the ring. These scripts are defined below.
[top of page] [ring and block definition scripts] [usage example] [example files]
define_block.m
define_block.m is a MatLab script that assists the user in defining block parameter files. The script prompts the user for all necessary inputs. It makes almost no assumptions about the block structure, and as a result it can take a lot of effort to define a block. The script defined in the next section, define_regular_block.m, is much easier to use, but imposes many limits on the block structure, e.g., that the crystals are regularly spaced and all consist of the same material. (Note: the one assumption the script does make is that there is at least one 'active' element in the block, e.g. a scintillator.)
define_regular_block.m
define_regular_block.m is a MatLab script that assists the user in defining block parameter files. define_regular_block.m is considerably easier to use than define_block.m (discussed above) but makes several assumptions about the block being defined - it cannot be used if the assumptions are not met. These assumptions are:
- The block has at most 1 radial layer with scintillator;
- There may be up to two layers of non-active material (e.g., housing, crystal wrap) before the scintiallator layer;
- There may be up to two layers of non-active material after the scintiallator layer;
- The scintillators are regularly spaced in the axial and transaxial dimensions (though the spacing and size can be different axially and transaxially);
- There can be an outer housing layer (inactive) around the scintillator array;
- There can be wrapping (inactive) around the scintillators in the transaxial and axial directions. This wrapping is the same thickness around each crystal, and the same thickness axially and transaxially.
We give an example using this function below.
define_ring.m
define_ring.m is a MatLab script that assists the user in defining ring parameter files. The script prompts the user for all necessary inputs and simplifies placement of blocks evenly around the ring.
blk_gen.m
blk_gen.m is a MatLab function called by define_block.m and define_regular_block.m. It creates the output block parameters file based on inputs passed by the calling function. Users wishing to create their own block definition script in MatLab may want to use this function; we suggest seeing the function comments, define_block.m and define_regular_block.m for information about the calling parameters and examples of use.
ring_gen.m
ring_gen.m is a MatLab function called by define_ring.m. It creates the output ring parameters file based on inputs passed by the calling function. Users wishing to create their own ring definition script in MatLab may want to use this function; we suggest seeing the function comments and define_ring.m for information about the calling parameters and an example of use.
[top of page] [ring and block definition scripts] [usage example] [example files]
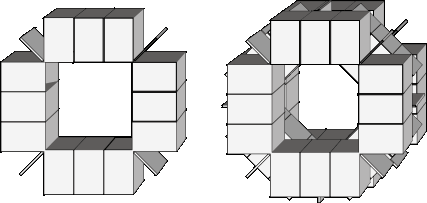
We give an example showing how to build a detector parameter file for the system shown below:
Figure 1. Example block detector ring and system: at left a single ring composed of 16 blocks of two different types; at right a tomograph composed of three copies of the ring, with the middle ring rotated by 45 degrees. (Figure taken from the main Detector Module page in the Users' Guide.)
The rings in the tomograph consist of two different sorts of blocks, shown in the following figure:
(These figures don't show the size of the block and rings, but we will give them plausible dimensions as we build them below - not to say the resulting tomograph is realistic!)
The following cut and paste from a MATLAB session shows how we used the MATLAB function define_regular_block.m to define a block like Block B shown above in Figure 2 (blue, boldface type indicates user response; when the only response is a carriage return we show a '↵'; red type preceded by a % indicates comments):
>> define_regular_block();
Creating a detector block parameter file for SimSET.
This program creates regular scintillator arrays with
block housing and crystal wrapping as the only additional
options. Another program, define_block.m, allows for more
general arrays. See the website for more info.
Please enter the file name for the block parameters: example_block_b.blocparms
Please enter the following information for the header.
Author name: Robert
Enter comment -
terminate with 2 consecutive carriage returns:
A four-by-four array of scintillator crystals with aluminum/tungsten
housing and tungsten inter-block housing.
↵
Now define the block geometry and materials.
How many scintillator elements (e.g. crystals) are there
in the transaxial (y) direction: 4
in the axial (z) direction: 4
What are the dimensions of these elements in the
in the radial (x) direction (cm): 2.5 % this is the crystal depth
in the transaxial (y) direction (cm): 1
in the axial (z) direction (cm): 1
The transaxial and axial sides of the scintillator elements
can have a layer of wrapping.(e.g., paint or tape).
Are these elements wrapped? (y/n) [y]: ↵ % values in brackets like this [y]
% are default responses and can be
% accepted by hitting return.
How thick is the wrap (note this will be doubled between crystals) (cm)? 0.1
There can be housing material on the transaxial and axial
sides of the scintillator block.
Is there housing material on these sides? (y/n) [y]: ↵
How thick is the housing on the axial and transaxial sides (cm)? 0.1
Radially there can be up to two layers of uniform material in front of
and behind the scintillator array (e.g. module housing).
How many layers of material are there before the scintillator (0, 1, or 2)? 1
How thick is radial layer 1 (cm)? 0.2
How many layers of material are there after the scintillator (0, 1, or 2)? 1
How thick is radial layer 1 (cm)? 0.2
Now define the materials used.
Default material indices from phg.data/phg_att_table:
air
0
con_tissue
15
water
1
copper
16
blood
2
perfect_absorber 17
bone
3
LSO
18
brain
4
GSO
19
heart
5
aluminum
20
lung
6
tungsten
21
muscle
7
liver
22
lead
8
fat
23
NaI
9
LaBr3
24
BGO
10 polycarbonateLowVisc
25
iron
11
polyethyleneNEMA 26
graphite
12
polymethylMethacryl 27
tin
13
polystyreneFibers 28
GI_tract 14
When using the default phg_att_table, you can use these material
indices to answer the following. If, however, you are using a
custom table you should use the indices appropriate to that table.
What is the scintillator material: 10 % BGO
What is the wrap material: 21 % tungsten
What is the housing material on the axial and transaxial sides: 21
What is the material for the first radial layer in front of the scintillator: 20 % aluminum
What is the material for the first radial layer behind the scintillator: 20
>>
A file defining Block A from figure 2 can be found below. Note that the block definition scripts cannot currently create this block - the scripts require that the blocks include at least one active (e.g. scintillating) element. (This is a bug that will be fixed in future versions.)
The following cut and paste from a MATLAB session shows how we used the MATLAB function define_ring.m to define a ring like those used to build the tomograph in figure 1 (blue, boldface type indicates user response; red type preceded by a % indicates comments):
>> define_ring
Creating a detector ring parameter file for SimSET.
This program fills one ring with block detectors,
prompting the user for the block filenames and positioning
information for each series of blocks.
See the website for more info.
Please enter the file name for the ring parameters: example.ringparms
Please enter the following information for the header.
Author name: Robert
Enter comment -
terminate with 2 consecutive carriage returns:
A ring with 12 detector blocks arranged in a square with three
blocks to a side. A blade of tungsten bisects each of the empty
corners. See the web pages for an illustration.
↵
Define the outer bounds of the ring: the minimum and maximum
axial values in the ring; the radius of a cylinder separating
the detectors from the collimator or object (the inner radius of the the
detector system); and the radius of cylinder that lies entirely
outside the detector system (the outer radius, separating the
tomograph from the rest of the universe).
Radial extent of ring.
Radius of a cylinder separating the detectors from the collimator (cm): 15
Radius of a cylinder separating the detectors from the universe (cm): 25
Axial extent of ring: this is not the final axial position of the ring.
Multiple copies of the ring can be given different axial shifts in
the detector parameter file.
Minimum axial extent of the ring (cm): -2.5 % in general it is easiest to make these
Maximum axial extent of the ring (cm): 2.5 % values +/-0.5 * the block axial extent.
Now specify the blocks in the ring. The program will prompt
you for a block parameter file, then ask you how many of
this block type are in the ring and how to place them. This
will be repeated until you have no more blocks you wish to
include in the ring.
Enter the data for block type 1
Enter file name the block parameters: example_block_b.blocparms
Radius at which to place the blocks (cm): 15
Axial position of blocks relative to the ring (cm): 0 % this is usually what you'll want
How many of this block type? 4 % we are going to start with just the 4 center blocks
Angular position (azimuth) for first block (degrees): 0
Are the rest of this block type evenly distributed around the ring? (y/n) [y]: ↵
% by accepting [y] the other 3 detectors will be placed at 90, 180 and 270 degrees
The blocks can be rotated in the transaxial plane. A rotation
of 0 degrees will position the block with its front face tangent
to the cylinder at the radius given above. A poistive value
will rotate the block counterclockwise, a negative value clockwise.
Angular tilt for first block (degrees): 0
Do the rest of this block type have this same tilt? (y/n) [y]: ↵
Add more blocks to the ring? (y/n) [y]: ↵ % we accept the [y] until we have input all the blocks
% now we place four blocks to the clockwise side of the first four
Enter the data for block type 2
Enter file name the block parameters: example_block_b.blocparms % we're using the same block type
Radius at which to place the blocks (cm): 15.8114 % select radius, angular position and tilt to
% place these blocks next to the first four.
Axial position of blocks relative to the ring (cm): 0
How many of this block type? 4
Angular position (azimuth) for first block (degrees): 18.435
Are the rest of this block type evenly distributed around the ring? (y/n) [y]: ↵
The blocks can be rotated in the transaxial plane. A rotation
of 0 degrees will position the block with its front face tangent
to the cylinder at the radius given above. A poistive value
will rotate the block counterclockwise, a negative value clockwise.
Angular tilt for first block (degrees): -18.435
Do the rest of this block type have this same tilt? (y/n) [y]: ↵
Add more blocks to the ring? (y/n) [y]: ↵
% now we place four blocks to the other side of the first four
Enter the data for block type 3
Enter file name the block parameters: example_block_b.blocparms
Radius at which to place the blocks (cm): 15.8114
Axial position of blocks relative to the ring (cm): 0
How many of this block type? 4
Angular position (azimuth) for first block (degrees): 71.565
Are the rest of this block type evenly distributed around the ring? (y/n) [y]: ↵
The blocks can be rotated in the transaxial plane. A rotation
of 0 degrees will position the block with its front face tangent
to the cylinder at the radius given above. A poistive value
will rotate the block counterclockwise, a negative value clockwise.
Angular tilt for first block (degrees): 18.435
Do the rest of this block type have this same tilt? (y/n) [y]: ↵
Add more blocks to the ring? (y/n) [y]: ↵
% now we place four tungsten blades between the rows of blocks
Enter the data for block type 4
Enter file name the block parameters: example_block_a.blocparms
Radius at which to place the blocks (cm): 21.3
Axial position of blocks relative to the ring (cm): 0
How many of this block type? 4
Angular position (azimuth) for first block (degrees): 45
Are the rest of this block type evenly distributed around the ring? (y/n) [y]: ↵
The blocks can be rotated in the transaxial plane. A rotation
of 0 degrees will position the block with its front face tangent
to the cylinder at the radius given above. A poistive value
will rotate the block counterclockwise, a negative value clockwise.
Angular tilt for first block (degrees): 0
Do the rest of this block type have this same tilt? (y/n) [y]: ↵
Add more blocks to the ring? (y/n) [y]: n
Ring parameter file generation complete.
ans =
[1x1 struct] [1x1 struct] [1x4 struct]
>>
The
final step in creating the block detector parameters is to create the
main detector parameter file: for block detector systems we
define the detector system as a stack of rings, plus some general
parameters (like energy resolution) which are given for all detector
systems. For our system we stack three copies of the example
ring, as defined above, arranged as shown in figure 1 above.
There is not yet a MatLab script to do this, but the parameter file is
quite short and simple compared to the block and ring parameter
files. We give an example block detector parameter file, example.detparms, using the above ring and blocks.
Together with the block and ring parameter files given below, these files can be placed in a copy of SimSET's samples/fastTest/PETblock directory (you may want to work in a copy of the directory so as not to change the fastTest simulation). By changing the line in PETblock.phgin that gives the detector parameters file
# DETECTOR PARAMETER FILE
STR detector_params_file = "PETblock.detparms"
to point to this example's detector parameters file
# DETECTOR PARAMETER FILE
STR detector_params_file = "example.detparms"
we
can run the PETblock simulation using the detector system defined above
(you may need to adjust the directory path to the phg executable,
depending where you have placed your directory)
% nice ../../../bin/phg PETblock.phgin
Example files
Here are the files for the block detector example above:
- example.detparms is the detector parameters file for the block detector system.
- example.ringparms is the ring parameters file.
- example_block_a.blocparms is the block parameters file for the tungsten blade.
- example_block_b.blocparms is the block parameters file for the block with the BGO crystals.
[top of page] [ring and block definition scripts] [usage example][example files]
Last revised by: Robert Harrison Revision date: 10 January 2013