 |
||||||
| School of Medicine • University of Washington • Box 357735 • 1705 NE Pacific St • Seattle WA 98195 | ||||||
Xpression user guide¶This guide will serve as an introduction to what Xpression does by means of the GUI. For other information related to the details of the code Xpression uses, please see Documentation. Since the gui runs the Xpression scripts, the options presented here correspond directly to the options found in the documentation for Xpression. Pipeline workflow overview¶Xpression analyzes FASTQ sequencing files, the output of “next-generation” sequencing from platforms including Illumina GAII and HiSeq. Xpression uses reference files specific to the organims or strain under investigation. Sequence reads are mapped to a genome fasta file and a genome loci genbank file provides loci boundaries and gene information. The user must supply sample-specific and sequencing-file-specific information such as Sample ID, Barcode, and so on, then click Xpression also supports the use of non-finished genomes that may be in multiple contigs. For these files, a single fasta and/or a single genbank should be provided which include all genome contigs as separate entries. Xpression will process one sample at a time, completing each step of the pipeline sequentially for each sample. Step 1 - Quality filtering and barcode extraction The sequencing fastq is filtered based on sequencing quality. If the sample is barcoded for multiplexing, Xpression can separate and extract each barcoded sample by providing barcode sequences as a semicolon-separated list in the ‘multiplexed barcodes’ field in the Options menu. Note In the case of samples multiplexed within the same sequencing file, specifying all the barcode sequences used in the ‘Multiplexed barcodes’ field will reduce the number of times the lengthy sequencing file is processed, shortening overall running time significantly. Supplying these additional barcodes will result in these barcoded reads being extracted as well as the current sample. These reads will be separated and saved for later runs of the pipeline on the samples corresponding to those barcodes. For instance, entering the the first barcode, ACCC, in the ‘sample barcode’ field and the remaining seven barcodes in ‘Multiplexed barcodes’ field will extract all eight barcodes from the example dataset. Step 2 – Map reads to genome reference The extracted reads for the sample (determined by barcode if present) are mapped to the genome reference as given in the ‘Genome reference’ field. File produced → mapping statistics table
Step 3 - Generate expression profile Generate an expression profile by counting reads within gene boundaries using the high-quality, sample-specific, mapped reads,
Step 4 – Generate visualisation file Create a visual representation of the expression profile for this sample.
Obtaining the Xpression GUI¶If the GUI file Xpression.jar is not already on your computer, or if you are not using Xpression Virtual Environment, you need to download it by right-clicking the following link and choosing “Save-as”: Starting Xpression¶Find the Xpression.jar file that you saved. Double-click to open this application. If double-clicking is unsuccessful, try right-clicking and choosing the “open with java” option that may be presented. 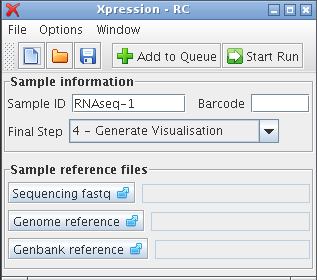
empty main window Entering sample data and options¶Upon opening the Xpression application, you should be presented with a window like Figure 1. A number of options and fields are available for modification. Some of these fields can be left as defaults, but some inputs are needed before Xpression can start analyzing your data. The required fields are located in the main window of Xpression, while other options that can be left as defaults for common analyses are located in the Edit options.. window under the Options menu. Sample Information¶The ‘Sample information’ fields change the sample’s identification for output files, a nucleotide barcode if sample have been multiplexed in the same sequencing run, and the final step to be run in the pipeline. Sample ID This can be anything to help describe your sample, but should be unique from other samples you have run previously to avoid overwriting data. Default RNAseq-1 Barcode This is unique to a multiplexed sample, and tends to be a short (3-6 nt) sequence ligated before the biologically relevant sequence. If only one sample is present in the sequencing file, this field should be left empty. Only the letters A, G, T, C, and N are allowed. Default empty Final Step The pipeline will start at step 1 and finish at the step indicated here. These steps are more fully described in the reference material. The default setting is to run the pipeline from step 1 to step 4. However, if only mapping statistics are required for instance, the pipeline only needs to be run to step 2, and the genbank file can be disregarded. To change this option, click on the arrow to see the list of steps. Default Step 4 Sample reference files¶These files are specific to the sample you want to analyze. They must be located physically on your hard drive or attached external media. To choose the files, you simply browse for its location, letting Xpression know where they are. The sequencing file may contain multiplexed, barcoded samples, so the same sequencing file should be chosen for all samples within that file. The genome reference fasta and Genbank reference files are specific to each sample as well and must correspond to the organism or strain of the sample. There are no defaults for these fields. Note Currently, Xpression handles reads in ‘nucleotide-space’ such as those produced by Illumina. Handling other sequencing technologies such as SOLiD, which outputs reads in ‘color-space’, is a feature that is being planned for the next version. Please see https://bitbucket.org/clparallel/xpression.stable/issues?kind=enhancement for updates. Sequencing fastq This is the sequencing file obtained from your sequencing facility. To select the file, click on the left-hand ‘Sequencing fastq’ button to bring up a file selection window. Navigate to the location of this file, which could be a place like the Desktop, your personal home folder or an external source like a DVD or removable harddrive. This sequence file format should be fastq, but may end with file extensions such as ‘fastq’, ‘txt’, or ‘seq’. If it is compressed (e.g. ends with .zip, .gz, .bz2) it may be read without being decompressed first, to save time and space. Note If you do not see the file you know to exist, try changing the ‘files of type’ menu at the bottom of the window from ‘fastq and txt files’ to ‘All files’ to see all available files in the current directory. Genome reference This file is required for mapping the sequence reads to a reference. If you want to run step 2 or higher of the pipeline, a valid genome file in the standard fasta format must be supplied. Genbank reference The last file is the Genbank reference file which contains loci information such as CDS boundaries and annotations. On NCBI’s database this file is known as genbank (full) or genbankwithparts. Running Xpression¶Other options exist that will be discussed next, but once the fields just mentioned are filled, Xpression is now ready to run with these settings. The run can begin immediately by clicking Note If a field is invalid or is required but empty, the field will be highlighted, and will need to be fixed before the sample can be run. To see the currently queued samples, select View sample list from the Window menu. Xpression output window¶This window displays information about pipeline output. Potentially useful information will be displayed as the sample runs, including which step it is processing, files it is using or generating and errors if they occur. 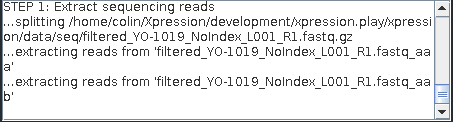
Xpression output window Run list window¶The Sample List shows each sample that has been queued. The columns show the sample’s ID, barcode used, if any, and status. Status can be Queued, Running, Stopped, or Error. If the sample is stopped or if an error occurs, the sample will have to be requeued and run again after potential issue has been resolved. Clicking a sample then the ‘Details’ button in the same window will display all the parameters used for that sample. In this ‘details’ window, the settings for that run can be saved if it was not already. 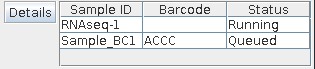
Xpression run list window Options window¶The options window contains parameters that do not generally require user input and are set to defaults. These defaults can be modified to suit the sample or library preparation method used. They can be reverted to defaults by selecting Restore defaults from the options menu in the main window. 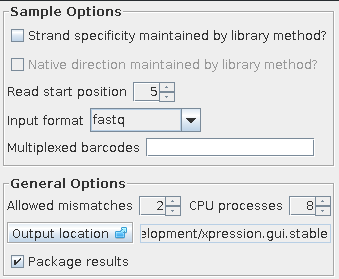
Xpression options window Sample Options¶Strand Specific If the library preparation method has maintained strand specificity, select this option. The reads will map to a specific strand on the reference genome, but if the library preparation method did not allow directionality to be maintained, this ‘strandedness’ mapping information will not be accurate. Expression data will be divided into genic and intergene for non-strand-specific and sense, antisense, igpos, igneg for strand-specific samples. Default not checked Native Direction If the library preparation method has maintained strand specificity and the resulting sequencing data is oriented forward relative to the native strand. If this is un-checked, the resulting read data is a reverse-complement to the native strand. Library preparation methods like the standard Illumina protocol produce native-strand reads, while others may produce reads that are a reverse-complement to the native strand. This option is disregarded if Strand Specific is not also selected. Default not checked Read start position This is the start of valid biological sequence. If a barcode was used, this field is automatically adjusted to the position following the barcode unless you choose for this check not to occur. For example, with a barcode of ACGT, the start position will be 5. Default 1 Multiplex barcodes In addition to the current sample being extracted from the sequencing file, you may indicate which other barcodes to extract as well in this field. Sequence reads with these barcodes will be extracted and saved for later use by additional runs of the pipeline for samples corresponding to them. This is an optional field, but can shorten overall running time by processing the sequencing file once instead of each time. To indicate which barcodes to extract, use upper-case barcodes separated by a semi-colon, such as AAAA;CCCC;GGGG. The current sample’s barcode will be extracted even if this field is left empty, and only corresponds to the other samples in the sequencing file. Default none Input format The sequencing file output assigns a quality score to each base position in a read. fastq refers to the Sanger/Illumina 1.8+ and fastq-illumina refers to Solexa/Illumina 1.3+/1.5+. The sequencing file you receive may not likely give any indication of this format, the file being labelled with a general ‘.txt’, ‘.seq’, or ‘.fastq’ file extension. For further explanation, please visit http://www.wikipedia.org/wiki/FASTQ_format. The pipeline will raise an error while processing if this format appears to be incorrect. Default fastq General Options¶These option may vary less from sample to sample, and are maintained between sessions of Xpression. These options are recorded in ‘.xpression_settings’ located in the user’s home folder. Allowed mismatches Number of allowed mismatches between the read to be mapped and the fasta reference genome in step 2. Default 2 CPU processes Number of processes to be run simultaneously (in parallel). This is usually set to 2 processes per CPU core, so quad-core computers would have 8 processes and dual-core would be half of that, 4. This value can be set higher or lower depending on the capacity of the CPU, but higher values may make the system unresponsive or unstable. Default 2 Output location Directory where sample runs are saved to. Each sequencing file will have a folder in this location and each sample a subfolder within this folder. This is the folder to look in to find the results when a sample has been processed. Default user home Package results Compress mapping statistics, expression_profile, and/or visualization files after analysis for conveniece. Default checked Storing parameters for later use¶It may be useful to save a copy of a set of parameters that are used often, or for later reference. The set of parameters can be saved and opened to speed up repeated analyses. Saving Xpression parameter file¶The set of options used for a sample can be saved as a parameter file for later use. For each sample, an option file is automatically generated and saved in the sample’s output folder. To save the current sample settings, select Save or Save As from the File menu. If the sample was queued and the details are now changed in the main window, that sample can still be saved by clicking the ‘Save’ button from the Details window accessed via the Sample List window. Opening an Xpression parameter file¶An Xpression parameter file can be opened to use a previously saved set of options. Xpression will look for the reference files defined in the parameter file, so if these have been moved or deleted a pop-up window will notify you of anything that needs to be fixed. Missing or invalid entry fields will be highlighted. To open a file, select ‘Open’ from the File menu and browse to the file location. | ||||||
 Start Run to start Xpression. Once the sample is added to the queue and/or the pipeline is started, the options for the sample cannot be changed. If an error occurs the pipeline, indicated by the entry in the Run list changing from
  Stop Run. Once the error has been resolved by providing proper information, the sample can be requeued or started again by click
  Add to Queue or