Timing
- one 45-50 minute period
Background
The microscope is used in laboratories, hospitals and machinist shops. The unaided human eye is unable to see the world in the detail needed to do many necessary things in our modern lives. We use microscopes to view bacteria, young sea urchins, and cancer cells. We observe crystal formation reactions, bullets in forensic investigations and quality in tool production using the microscope. See Mazia.
Materials
- microscopes
- sea urchin gametes or embryos, or pond water. (you can use yeast dissolved in a water with a little sugar initially because yeast do not move, but they are boring!)
- depression slides or slides and cover glasses.
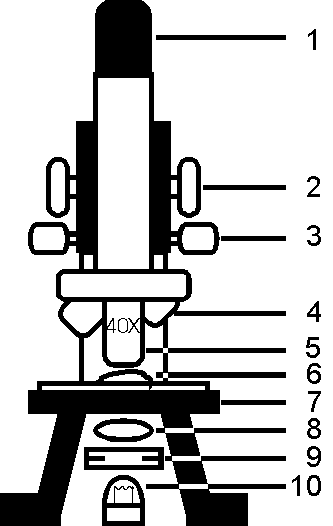
Parts of the Microscope
|
|
1. Eyepiece |
Contains a magnifying lens that focuses the image from the objective into your eye. |
|
2. Course Adjust |
For focusing under low magnification |
|
|
3. Fine Adjust |
For focusing under high magnification or low |
|
|
4. Low Power Objective |
For large specimens or overview |
|
|
5. High Power Objective |
For detailed viewing or small specimens |
|
|
6. Specimen on glass slide |
What you want to look at |
|
|
7. Stage |
Supports specimen in correct location to lens |
|
|
8. Condenser |
Focuses the light on specimen |
|
|
9. Diaphragm (iris or disc) |
Regulates amount of light and contrast |
|
|
10. Light Source |
Illuminates the specimen for viewing |
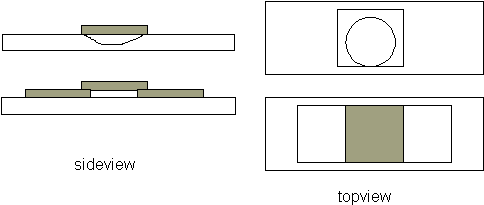
A Depression slide can be "made" by using a regular slide and three cover glasses
Preparations Before Work Begins
- Students should have an introductory lesson on the use of the microscope. Make sure they can identify and tell the purpose of each part of the microscope. (In most cases the student has done this in prior laboratory activities and classes.)
- Remind students to label materials as they work and to keep their lab stations orderly and clean. [this point will pay off a thousand fold if they adopt this practice now!]
- Label eyedroppers, test tubes and slides with what they will contain. In the case of sea urchin gametes, mixing them up will result in fertilized eggs before you are ready for embryos.
- ALWAYS start observations on any new slide with the lowest power objective. Always return the microscope to the lowest power objective when done observing anything and before putting away the microscope. The shortest lens is the least likely to be "smashed" against a slide or to be dipped in sea water and is the easiest to use to find a new specimen.
Observations
- If a depression slide is available, students should add a drop of the suspension from the culture to the well on the slide. Or if you are using the 3 cover glass technique, place the two "bridge" cover slips onto the slide and add the drop between the cover slips.
- Add the top cover slip.
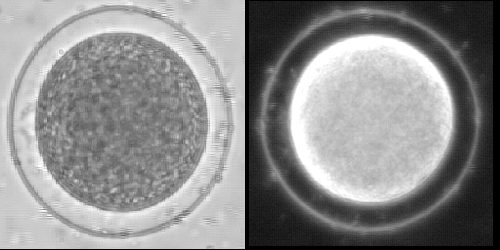
- Observe and focus on the sample using the lowest power objective. Adjust the light source as needed, often lower light optimizes viewing by increasing contrast. The 4x objective is good for scanning a large number of cells. The 10x is good for general observations.
- Use the 40x when you need to see more clearly. As students move to the 40x remind them to:
- Focus first at 10x.
- Leave the course focus knob in position and shift to the 40x while observing that it does not come in contact with the suspension or the cover slip
- Use only the Fine Focus knob with the 40x objective.
- On some microscopes you may be able to adjust the diaphragm to be "between" stops simulating a "dark field" condition. The cells will be white against a dark background. This is an excellent way to make observations.
 |
|
| Brightfield | Darkfield |
- correct objective
- placement of slide
- functioning light source
- correct light level and diaphragm setting (too bright a light decreases contrast making the specimen appear more transparent)
- specimen selection (no air bubbles please!)
- focus
- student understanding (check out their drawings in progress)
Student Cleanup
- Always return to the low power objective.
- Wipe up any sea water spilled with a cloth or paper towel dampened in tap water.
- Cover microscope with dust cover.
- Clean and dry slides and cover glasses. If stored wet, they will stick together permanently.
- Return cultures to main dish or dispose of down sink.
Size Under The Microscope - lesson plan and graphic for overhead
Use of the Micro-Video Camera using a video camera on a microscope for demonstrations, research projects, etc. includes sources of equipment.
Evaluation
- test on parts of the microscope
- lab reports with drawings of specimen(s)