![]()
Assigning a Provider Checklist
Otobase allows the administrator to define a Clinical Group's checklist as the default "master checklist" for the database (see Master Checklist for data entry). This is especially useful in clinical studies to ensure that any record being saved by a participant meets the study criteria. The Provider Checklist feature allows the administrator to override the master checklist for individual providers.
To assign a Provider Checklist
- Open and unlock the Provider Information form.
- Click Provider Checklist and a form includes a full list of Clinical Groups on the left, with alphabet tabs for quicker navigation, and a box on the right that shows the current checklist selected for this provider.
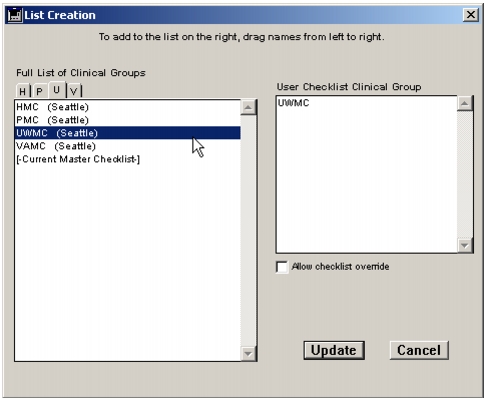
- From the list of Clinical Groups on the left, choose the group whose checklist you wish to assign to this provider, and drag or use shift-click to move it to the User Checklist Clinical Group box on the right. If a checklist is already assigned, a new checklist will replace the old one.
- Click Update. Click OK to save the provider record.
Note that each provider can only be assigned a single checklist. Clicking "Allow checklist override" enables the provider to save a record even if it does not meet all checklist criteria.
Format On button
The administrator can set up your version of Otobase to automatically capitalize some letters in the name, address, city, and country text fields. This occurs when you enter information and then tab or click out of the field. To override this feature, click the Format On button at the bottom left of the form. It turns to a No Format button. You can turn the auto-format back on when you move to a different text entry field. You can also set a default format as a Preference item (see Format On/No Format).

State List button
The form has a built-in function that helps you pick out the standard two-letter abbreviation for a U.S. state, or other administrative subdivision. This feature can be enabled by default from the Preferences form. You can override the State List function by clicking cancel when the list of state names appears, or by clicking the State List button, which turns to `No State.' For more about using the Preferences form to enable the State List function, as well as modifying any listing of states, provinces or other administrative subdivisions, see State ListState List and Creating a non-USA State ListCreating a non-USA State List).
|
Otobase Otobase Web Site Voice: (206) 221-2430 Fax: (206) 221-5152 otobase@u.washington.edu |