
CIC Student Guide Online
E-Portfolio
The ePortfolio tool allows you to electronically collect and reflect upon various “artifacts.” Artifacts may include essays, photos from study abroad experiences, scans of papers with teacher comments, PowerPoint presentations, Web sites, digital video projects, audio recordings—basically anything you've created as part of your university learning experience. EPortfolio provides interfaces for easy uploading of artifacts and password-protected Web publishing of the entire portfolio. You may also request confidential viewer feedback on each portfolio section (only the portfolio author may view the comments). Your instructor may create a custom portfolio template for your class (an "invited portfolio") or may ask you to design your own portfolio. For more information on the Portfolio tool, see Catalyst's Portfolio Guide.
Accessing the ePortfolio Tool
Canvas’ Portfolio is a web-based program you can access from any computer with an internet connection. To open ePortfolio, complete the following steps:
- Open a Web browser and go to Canvas at http://canvas.uw.edu.
- From the welcome screen, select Web Tools Login and log on with your UW Net ID and password when prompted.

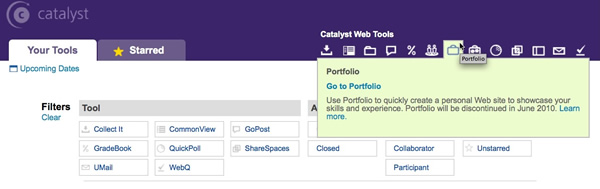
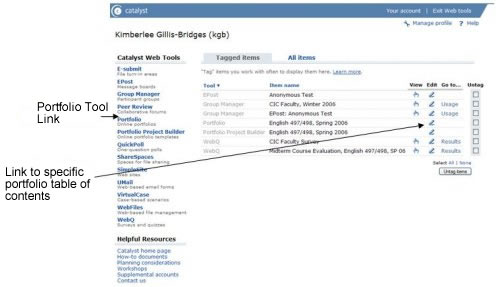
- Place your cursor on the Portfolio icon
 under Catalyst
Web Tools and select Go to Portfolio in the
box that appears.
under Catalyst
Web Tools and select Go to Portfolio in the
box that appears.
- If your instructor has distributed a portfolio template to the class, follow the instructions below for installing, working on, and submitting a portfolio project. If your instructor has asked you to design your own portfolio, follow the instructions below for creating a new portfolio.
![]()
Installing a Portfolio Project
Some instructors will create a template for students so that they do not have to build their portfolios from scratch. This template is called a “Portfolio Project.” There are two ways an instructor might distribute the Portfolio Project:
- Via URL: To install a Portfolio Project from a URL, paste the link into a web browser and log on with your UW Net ID and password when prompted. Scroll to the bottom of the page and click the Continue button to install the new portfolio into your “My Portfolios” folder (or another folder, if you choose).
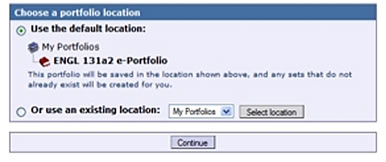
Once the portfolio project has been installed, you will be listed as the owner and you can begin to modify the contents.
- Via invitation: If your instructor has invited class members to complete a Portfolio Project, the invitation will appear on your portfolio page. To see your invitations, open a web browser and go to portfolio.washington.edu. Log on with your UW Net ID and password when prompted. In the "New portfolio invitations" box, you will see your instructor’s portfolio template:

To accept the portfolio invitation, follow the steps below:- Click the title of the invited portfolio in the "New portfolio invitations" box. You will move to the "Accept a portfolio" page.
- Read the description of the portfolio and any learning objectives or instructions.
- Save the new portfolio in the default location, "My Portfolios."
- Click the Accept portfolio button. You will move to the Portfolio summary page, where you can start working on your invited portfolio.
![]()
Working on an Invited Portfolio
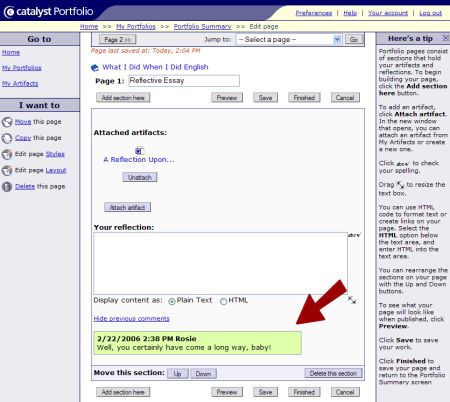
Each invited portfolio page is made up of sections that provide instructions and a space for you to enter your reflection and to attach artifacts. Follow the steps below to start working on your invited portfolio:
- Open a web browser, go to portfolio.washington.edu, and log on with your UW Net ID and password.
- Click “My Portfolios” in the "Go to" menu and then click the title of the portfolio you would like to work on. You will move to the Portfolio summary page.
- Click the title of the page you would like to work on. You will move to the "Edit page" screen.
- Read the instructions your instructor has provided:
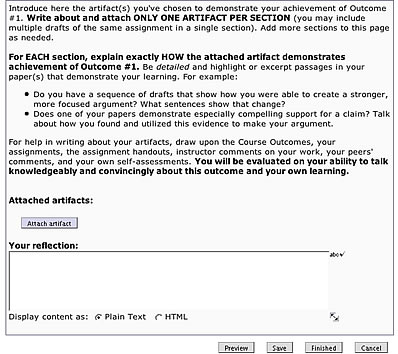
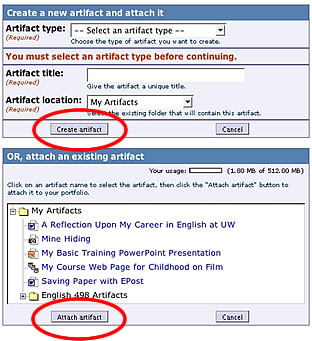
- To add an artifact, click the Attach artifact button. A new window will open that will allow you to attach an artifact.
- You may select an existing artifact from the list of your artifacts at the bottom of the artifact window. Once you've chosen an artifact to place within the page, click the Attach artifact button at the bottom of the screen. You will be taken back to the "Edit page" screen and your artifact will be attached.
- Alternatively, you can create and attach a new artifact. To do so, choose “A file from your hard drive” in the Artifact type box. Click the Browse button to find files located on your computer, and then click “Open.” In the designated boxes, enter a title, description, and keywords for your artifact. Leave Artifact location set to “My Artifacts.” Click the Create artifact button. You will be taken back to the "Edit page" screen and your artifact will be attached.
- Repeat steps 6 or 7 to attach or create another artifact. To remove an artifact, click the Unattach button beneath the artifact’s icon.
- To enter a reflection, type in the text area labeled "Your reflection" or copy and paste text from another source. Any formatting originally applied to the copied text will be lost when pasted into the text box. As with all text boxes in the Portfolio tool, it is possible to use HTML formatting codes. If you do so, be sure to select “HTML” from the Display content as options at the bottom of the text area.
You can use the following four buttons as you work on your pages:
- Preview: This option shows you what the page will look like when published on the web.
- Save: Be sure to save your work frequently.
- Finished: This will save all your changes and return you to the Portfolio summary page.
- Cancel: This will ignore any changes you've made since you last saved the page and return you to the Portfolio summary page.
![]()
Submitting an Invited Portfolio
Your instructor may ask you to publish your portfolio to the web, or he or she may request that you directly submit your portfolio. To web-publish your portfolio, follow the instructions for “Publishing Portfolios to the Web.” To submit your portfolio directly to your instructor, complete the following steps:
- Open a web browser, go to portfolio.washington.edu, and log on with your UW Net ID and password.
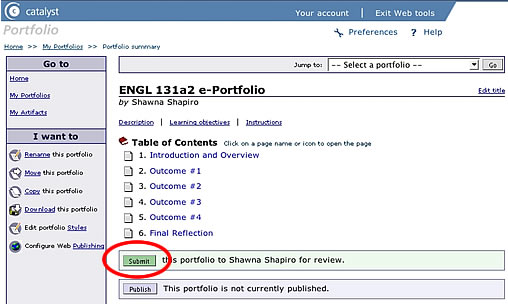
- Click “My Portfolios” in the "Go to" menu and then click the title of the portfolio you would like to submit. You will move to the Portfolio summary page.
- Click the green Submit button next to “Submit this portfolio to instructor name for review”:
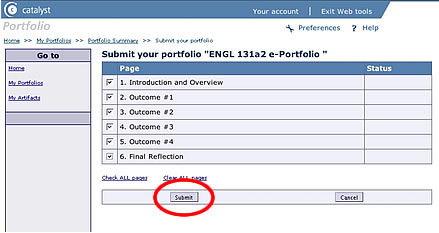
- On the portfolio submission page, check the boxes next to the pages you want to submit. If you want to submit all pages, click “Check ALL pages.” Click the Submit button. You will see a message indicating that your portfolio has been submitted to the instructor. Please note that you cannot make changes to portfolio pages after you have submitted them.
- Once you have submitted the portfolio, you will return to the portfolio summary page. You should see a “Submitted” icon
 next to each page title.
![]()
Creating a New Portfolio
- To create a new portfolio, click on the Profile option at the top right of the screen from your profile homepage.
- Select ePortfolios from your profile page.
- On the ePortfolio introductory page that appears, click the Make E-Portfolio button.
- Type your portfolio title as pictured below, check the Make it Public option and click the Make ePortfolio button.
- The ePortfolio tool will confirm your successful portfolio creation and take you to an automatically generated Home section that contains a default page entitled Welcome. Confirm that your security setting is Public.
- Once you’ve created a new portfolio, you should see a page with the portfolio’s name and table of contents. If you do not see this page, select My Portfolios from the Go to options and select your portfolio from the list that appears.
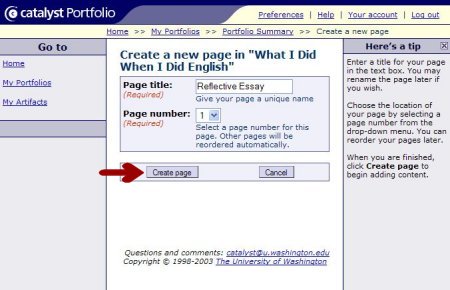
- Select Create a new page from the I want to options.
- On the new page screen, type in a page title and leave the page number as is. Click the Create page button.
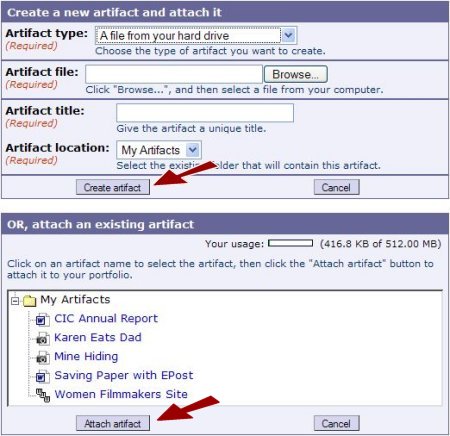
- On the page contents screen click the Attach artifact button to upload the document, image, or other content you plan to discuss in the portfolio.
- On the artifact screen, select the type of artifact you wish to upload from the Artifact type drop-down menu. Most of the time, the artifact will be a file from your hard drive. Click the Browse button next to the Artifact file box and locate the file on your computer. In the Artifact title box, type a unique, descriptive title for your document; all uploaded artifacts go into a single folder, and precise titling makes items easier to locate. Leave the Artifact location information as is and click the Create artifact button.
- Once you’ve uploaded your artifact, you’ll return to the new page contents screen, which will now display an artifact icon. If you wish to upload additional artifacts, click the Attach artifact button and follow the procedure described above. Type information identifying the artifact and your discussion of the artifact in the Your reflection box.
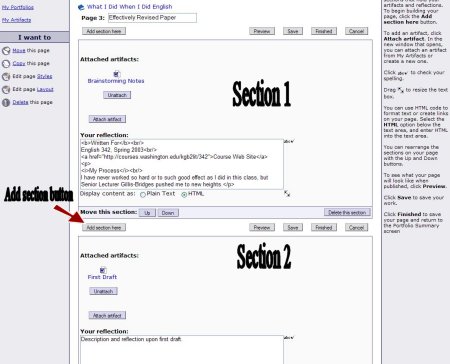
- If you wish to add another section to your page, click the Add section here button and follow the procedure described above to upload an artifact to the new section.
- To remove an artifact, click the Unattach button.
- You may preview or save your portfolio page at any time by clicking the Preview or Save buttons.
- If you know HTML, you may insert coding into your reflection text and click the HTML bubble in the Display content as options. If you would like to try inserting common HTML tags into your message, use the following guide:
- To italicize a title or word: <i>The Title</i>
- To place a word in bold type: <b>word</b>
- To indicate a paragraph: <p>paragraph text</p>
- To indicate a line break, or one return: <br/>
- To direct others to a Web page you have found useful: <a href="http://www.thepage.edu">The Page Name </a>
- If you would like to spell-check text, click the spell-check icon
 next
to the Your reflection box.
next
to the Your reflection box. - Once you’ve completed your page, click the Finished button. You’ll return to the portfolio table of contents screen, which will now list the page you’ve created.
- Once you’ve finished your portfolio, you should return to the portfolio table of contents page. If you do not, select My Portfolios from the Go to options and choose your portfolio from the list that appears.
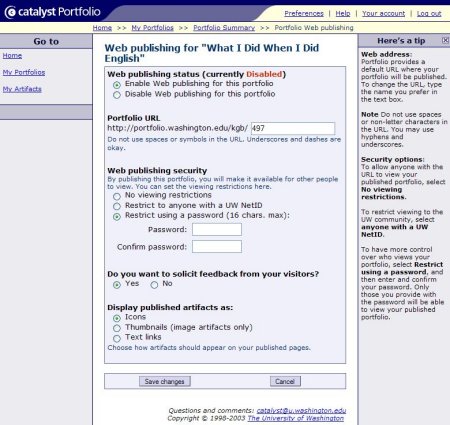
- Click the Publish button under the portfolio's table of contents.
- In the publishing screen, make the following selections and click the Save changes button:
- Web publishing status: “Enable.”
- Portfolio URL: The box will display your portfolio title, for example “What-I-Did-When-I-Did-English.” Since the title makes for a long URL, replace it with something shorter, like the course number or subject. Refrain from using capital letters or spaces in the portfolio URL, as browsers are case-sensitive and may replace spaces with nonsense characters such as “20%.”
- Web publishing security: You may allow anyone with web access to view your portfolio, or you may restrict access to the UW community or to those you provide with a password. If you want people without UW Net IDs to see your portfolio, for example family members or potential employers, select the no restriction or password restriction options.
- Feedback: Choose “Yes” if you want viewers to have the option of commenting on your pages. Note that feedback will be visible only to you, not to all readers.
- Display artifacts as: You have the option to display uploaded artifacts as icons or text that link to the artifact file. If your portfolio includes images, you may display artifacts as thumbnail pictures that link to the uploaded image file. If you select this option, non-image artifacts will display as icons.
- Once you click Save changes, you will return to the portfolio table of contents screen, where you will see a URL for your published portfolio. Write down this URL for future reference.
- Select Log out once you are finished using the Portfolio tool.
- Selecting Portfolio from the left-hand column and choosing the desired portfolio from the list that appears.
- Clicking the Edit icon next to the Portfolio's name.
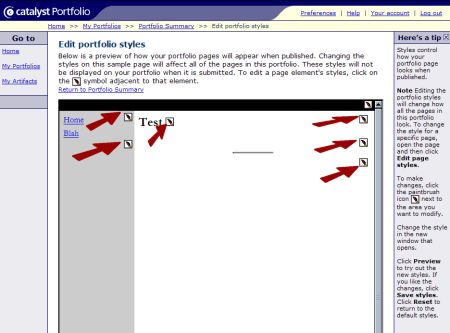
- Access the portfolio table of contents as described in the “Editing” section above. Select Edit portfolio Styles from the I want to options.
- On the edit style page, click the brush icon
 next to each element to edit
that element. If you place your cursor on the brush icon, the bottom of
the browser window or a pop-up box will display text describing
the element you’ll edit by clicking.
next to each element to edit
that element. If you place your cursor on the brush icon, the bottom of
the browser window or a pop-up box will display text describing
the element you’ll edit by clicking.
- You have the option to edit four general types of elements: navigation bar colors, text, section dividers, and links.
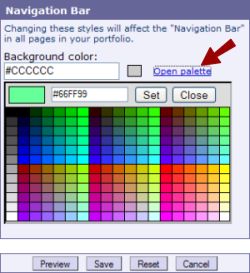
- Navigation bar colors: Select Open palette to display a color picker. Move your cursor over the small colored squares to see a swatch of the color in the larger display box. Once you see a color you like, click on the small colored square to set
the color. You may preview the change by clicking the Preview button. Click the Save button to save your changes and exit the
editing box.
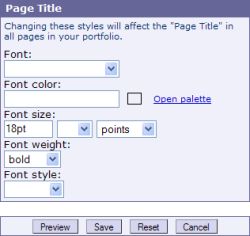
- Text: Select your desired font type, color, size, weight, and style from the drop-down menus or color pickers. When specifying a
font type, make sure that it’s one most users will have on their computers (for example Times New Roman, Arial, Courier, Verdana,
Georgia, etc.). Note that Font weight specifies the darkness of the font—from light to bold—while Font
style specifies the appearance
of the text—italic, normal, etc. You may preview the change by clicking the Preview button. Click the Save button to save your changes
and exit the editing box.
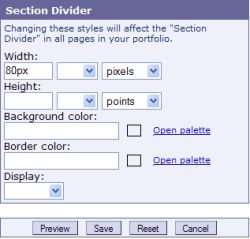
- Section dividers: Select your desired divider width and height from the drop-down menus. Use the Background
color and Border color palettes to set the dividing line color and the color of the thin line outlining the divider. The thicker the
divider height, the easier the colors are to see. To specify the divider’s alignment, or to remove section dividers
from your pages altogether, use the Display drop-down menu. You may preview your changes by clicking the Preview button.
Click the Save button to save your changes and exit the editing box.
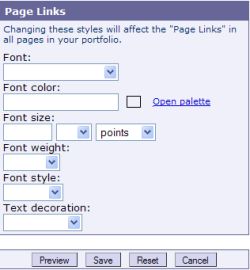
- Links: As with fonts, you may select type, color, size, weight, and style with the appropriate drop-down menus and palettes. Text decoration options allow you to choose whether you want link text to be underlined, line-free, or blinking. You may preview
your changes by clicking the Preview button. Click the Save button to save your changes and exit the editing box.
- To return any element to its original setting, click the brush icon to open the appropriate editing box and click the Reset button.
- Artifact folders: To create folders for distinct sets of artifacts:
- Access the portfolio table of contents as described in the “Editing” section above.
- Select My Artifacts from the Go to options.
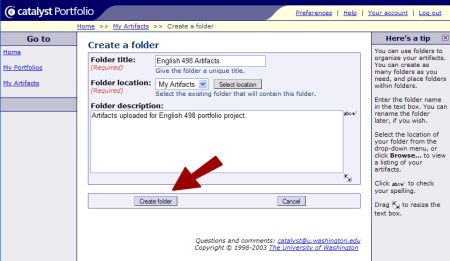
- From the artifacts screen, select Create a new folder from the I want to options.
- In the new folder screen, type a distinct folder title, leave the Folder
location box as is,
and add a description if you wish. Click the Create folder button.
- Once you’ve created a new folder, you may move existing artifacts into
it by accessing your artifact list, clicking on the name of an individual
artifact, and selecting Move this artifact from the I
want to options.
You may also
choose the folder from the Artifact location box when you upload a new
artifact.
- Artifact description: Portfolio includes a search function that helps you find artifacts you ’ve already uploaded. However, you must provide descriptive and keyword information for the program to search:
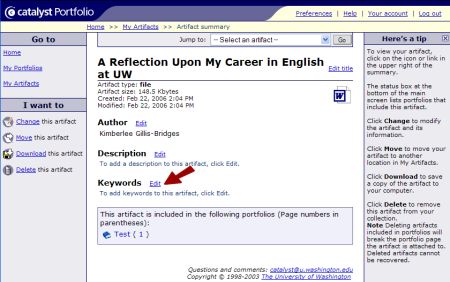
- To access a detail screen for each artifact, choose My Artifacts from the Go to options on any screen.
- Click on an individual artifact’s name from the artifact list that appears.
- In the detail screen, click Edit to input a description and keywords. When typing keywords, remember to separate them with spaces. Once you’ve added each detail, click the Save changes button.
- You will now be able to search for the artifact by going to My
Artifacts and selecting Search for an
artifact from the I want to options.
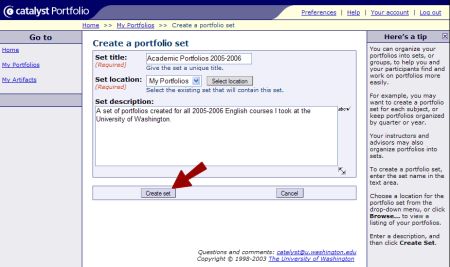
- Select My Portfolios from the Go to options on any portfolio screen.
- Choose Create a new set from the I want to options.
- In the new set screen, type a unique Set title, leave the Set location as is, and include a description if you wish. Click the Create set button.
- Once you’ve created a new set, you may move existing portfolios into
it by accessing your portfolio list, clicking on the name of an individual
portfolio, and selecting Move this portfolio from the I
want to options.
You may also choose the set from the Portfolio location box when you create
a new portfolio.
Creating New Portfolio Pages and Uploading Artifacts
Typically, you will create separate pages for each item in the portfolio. Each page can include multiple artifacts and sections. For example, you may want to discuss various drafts of a single paper. To make new pages, complete the following steps:

![]()
Publishing a Portfolio to the Web
Before you can share your portfolio with others, you must publish it to
the web. To do so, complete the following steps:
![]()
Editing Portfolio Contents
After you have created and published your portfolio, you may want to
add content or make other changes. To edit your portfolio, go to Catalyst’s
site and log on to the Web tools as described in the “Accessing
the Catalyst Portfolio Tool” section above. From the account screen you
have two choices:
The table of contents screen will appear. From here, you can click on the title of an individual page to edit that page, or you can add pages as described above. You do not have to republish your edited portfolio. Once you save your changes, the revised document will appear on the web.
![]()
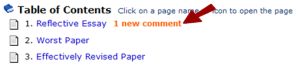
Viewing Portfolio Comments
Unlike blogs, which display viewer comments for all to see, Portfolio
allows only the author to see viewer feedback. To check for comments, go
to Catalyst’s site and access your portfolio table of contents as
described in the “Editing” section. If you have received
feedback on any page, a note will appear next to that page’s name.
Click on the page name to see the comments.
![]()
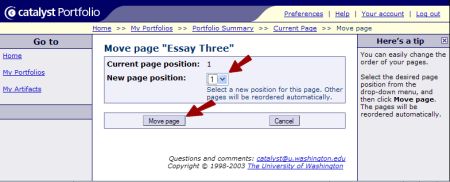
Reordering Portfolio Pages
Once you’ve created your portfolio, you may want to change the order in which pages appear. To do so, access the portfolio table of contents page as described in the “Editing” section. Click on the name of the first page you wish to reorder and choose Move this page from the I want to options. On the page that appears, select a new position for the page and click the Move page button. When you return to the portfolio table of contents screen, your pages will be listed in the new order.
![]()
Deleting Pages and Portfolios
You may delete individual portfolio pages and entire portfolios by accessing the portfolio or page as described in the “Editing” section and selecting Delete this page or Delete this portfolio from the I want to options. You’ll be prompted to confirm the deletion.
![]()
Editing Portfolio Styles
Published portfolios are by default visually rather unimpressive, with basic black borders, a hyperlinked table of contents, and “Previous” and/or “Next” options on the bottom of each page. However, ePortfolio allows users to alter colors and font styles within the basic page design. To do so, complete the following steps:
![]()
Managing Artifacts
You may find yourself using the ePortfolio tool in multiple courses. To help you organize what could become an unwieldy list of artifacts, Portfolio offers folder and artifact description features.
![]()
Managing Portfolios
Catalyst’s Portfolio tool offers portfolio management features for students who create portfolios for several courses over an academic year or construct both academic and job portfolios. To create folders—or “sets”—for groups of portfolios:
![]()