
CIC Student Guide Online
CANVAS E-Portfolio
What are Canvas E-Portfolios?
The Canvas E-Portfolio tool allows you to electronically collect and reflect upon various “artifacts.” Artifacts may include essays, photos from study abroad experiences, scans of papers with teacher comments, PowerPoint presentations, Web sites, digital video projects, audio recordings—basically anything you've created as part of your university learning experience.The Canvas E-Portfolio tool provides interfaces for easy uploading of artifacts and password-protected Web publishing of your entire portfolio. You may also request confidential viewer feedback on each portfolio section (only the portfolio author may view the comments). Your instructor may create a custom portfolio template for your class or may ask you to design your own portfolio. Your instructor portfolio assignment will help you to know the expectations for your specific assignment. For more information on the Portfolio tool generally, see the Canvas' Portfolio Guide.
Before you Create Your E-Portfolio:
- Begin by logging into Canvas and opening your ePortfolio assignment. This will be your guide for understanding your instructor's expectations.
- Follow the ePortfolio instruction steps below.
![]()
How to Create a Canvas E-Portfolio:
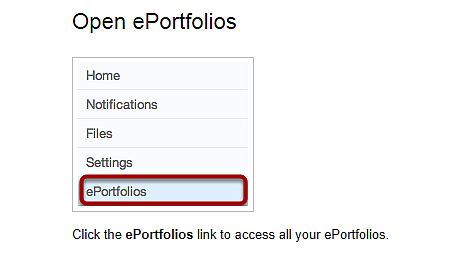
- Click on the Profile option by clicking on
your name at the top right of the screen:

- Select ePortfolios from your Profile page
on the left side bar:
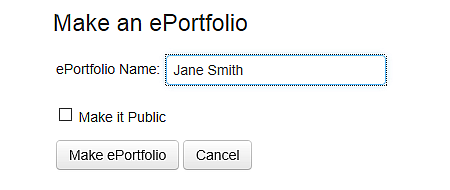
- On the ePortfolio introductory page that appears, click the Create
an ePortfolio button on the right.

- Type your portfolio title as you wish (make sure it is both unique
and clearly identifiable). You can either check the Make it Public option
or not. Making it public will allow anyone to access it, while making
it private will only allow access to those with whom you've shared the
link. Click the Make ePortfolio button to finish making your
portfolio.
**Remember the private or public setting can be modified at any time.**
- The ePortfolio tool will confirm your successful portfolio
creation and take you to an automatically generated Home section that
contains a default page entitled Welcome. Confirm that your
security setting is consistent with what you want. You can also modify
it here if needed. When you are ready to start building your portfolio’s
pages, click on the Go to the Actual ePortfolio link.
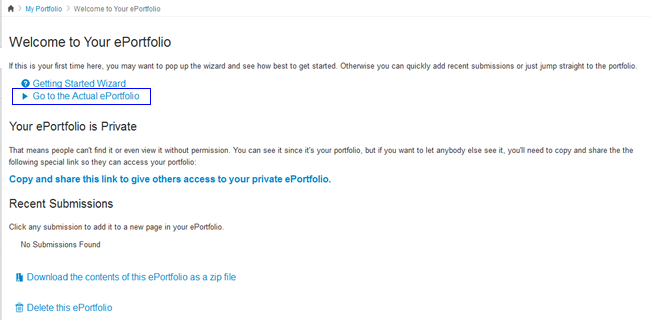
- Now you are ready to create pages!
![]()
How to Create Portfolio Pages:
- On the righthand side of your screen, click Organize/Manage
Pages.
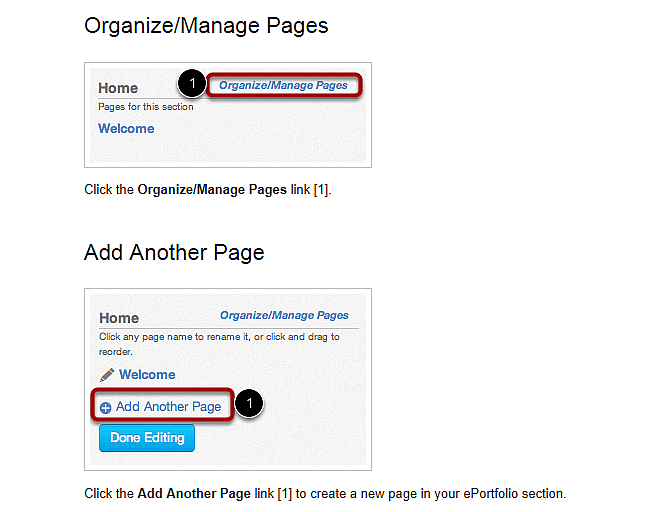
- Click Add Another Page and add as many pages as necessary,
titling each page as you go. If you prefer to add content to each page
as you go along, you can move forward to the instructions for adding
content. When you are ready, you can add more pages by clicking Add
Another Page again. *For EWP 100-level portfolios,
you will likely be using the naming conventions of “Outcome 1,” “Outcome
2,” or “Paper 1,” “Paper 2” etc. depending
on the way you have chosen to organize your portfolio. Your last three
sections will likely be “Final Reflection,” “Compendium
of Work” and “Release Form.”*
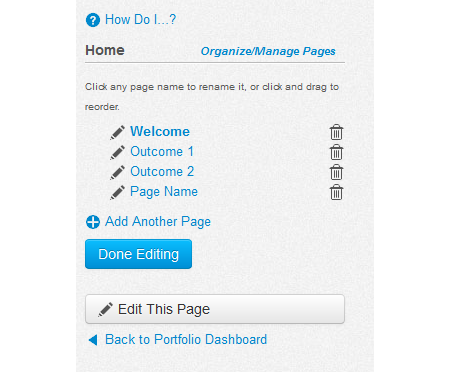
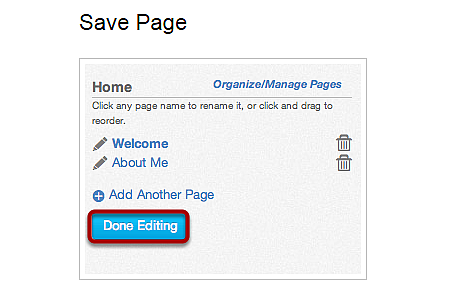
- Click Done Editing to finish creating your pages.
If you would like to rename a page, you can do so by clicking the pencil
icon to the left. If you need to delete a page, you can do so by clicking
the trash can icon to the right.
- Once you have created and saved all of your pages, you are ready to start adding content!
![]()
How to Add Content to Pages:
- To add content to pages, there are several content
options. They can be accessed through the other options on the right
hand side.
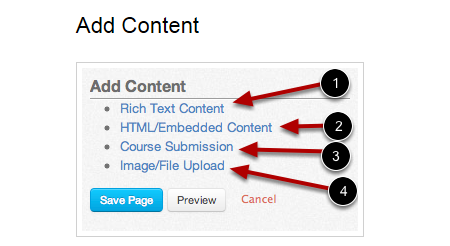
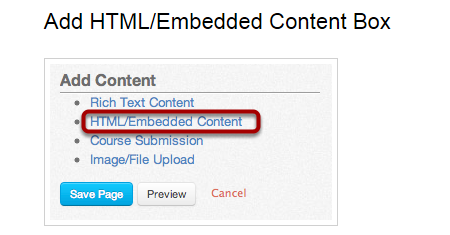
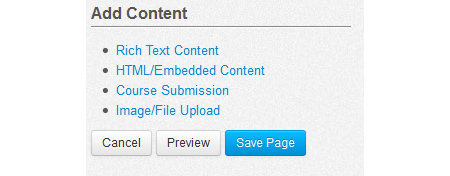
- You may add content boxes by selecting from options in the Add
Content menu.
IMPORTANT TO NOTE: Each time you add content, you must add a new content box. So, if you have several files to upload, you will need to add a new content box each time. The same rule applies for all of the content types. - As you’re working on adding content, you can move the
content boxes to different orders on your web page by hovering
over the top left corner of the box and clicking down on the arrow
icon to move. You may also delete any content at any time by
selecting the Trash icon to the right of the content label.

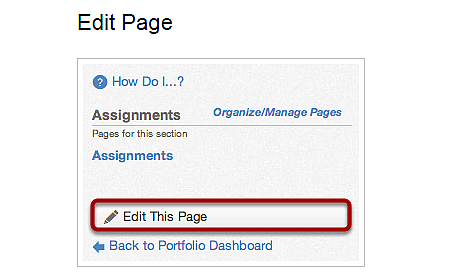
- Once you have decided which page to add content to, click on
the title of the page you would like to Edit on the right hand column.
- Click the Edit this Page button on the right hand
column to begin adding content.
- You can add text for your portfolio pages directly into the Rich
Text Content Editor which appears. There you can modify the
formatting, size, and appearance of the text, as well as insert images
(with the picture icon), and link to URLs or other content within canvas
(with the chain icon).

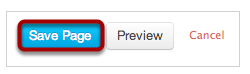
- Click the Save Page button to save your content. Make
sure you do this each time you add new content. It is also advisable
to keep the content saved elsewhere (in a word doc, for example). You
may also Preview before saving to see whether the page
appears as you wish.
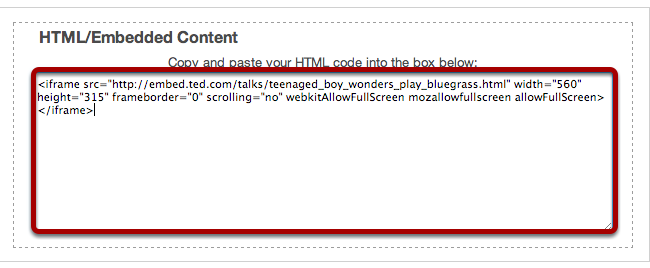
- To add HTML or Embedded content, click the option
at the right. Once a new content box appears, copy and paste the code
directly in the box. For most videos, you will need to use the embed
code (In YouTube, for example, you can retrieve this by clicking on Share,
and then Embed below the video play screen). You can Save and Preview as
desired.

- To add a Course Submission to your page (for example,
in the compendium of work), you will select that option from the panel.
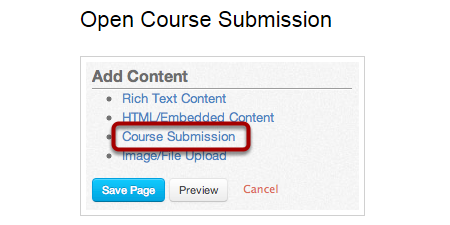
- To add a course submission, click on the assignment
[1] to upload it to the assignment and you can select multiple
assignments to upload. All assignments you have ever submitted via
Canvas will be listed in chronological order with the newer assignments
appearing at the top and the older assignments appearing near the bottom. Click
on the Select Submission button to upload the submission to your page
[2]. You may also click the Preview button to confirm whether
the course submission is the correct one you would like to submit.
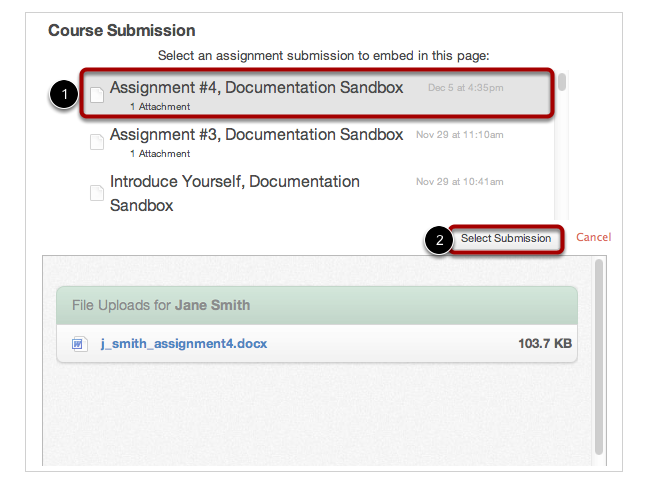

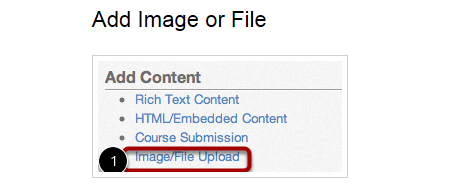
IMPORTANT NOTE: You can only add one assignment at a time. You will need to add a new course submission for each assignment you want to embed. This is especially important to keep in mind when 100-level expository writing students are compiling their compendium of work. - Finally, you can choose to upload an image or file from outside
of Canvas by selecting Image/File Upload in
the options.
- Click the Select/Upload File button [1] to upload
the file.
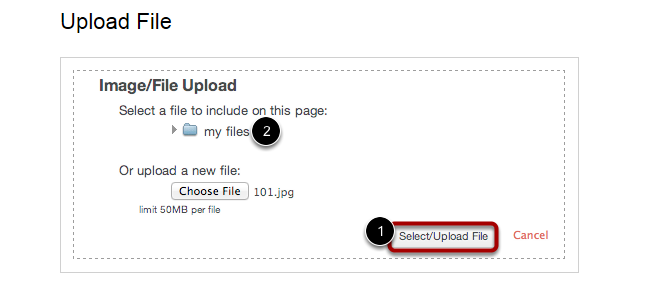 NOTE: You
can also use the files you have previously uploaded to your personal
files by clicking on my files [2].
NOTE: You
can also use the files you have previously uploaded to your personal
files by clicking on my files [2].
- Once you have finished with your editing for your page you are working
on, click on Save Page which appears at the bottom of
the page and in the right menu.
- Once you have completed all of your editing within pages, select the Done
Editing button in the bottom of the right menu.
- After you've finished editing, you are ready to share!
![]()
How to Share the Portfolio:
If you have not made your ePortfolio public, you will need to share your ePortfolio, especially with your instructor. Sharing a private ePortfolio link will give others access to viewing your ePortfolio without having to log into Canvas.
- To access the link to your eportfolio, log
onto Canvas and click on your name in the top right-hand menu.
- Next, select ePortfolios from your profile page on
the left side bar.
- Once in this page, you can modify the privacy settings.
 Use
the Copy and share this link to give others access to your
private ePortfolio link [1]. You can now copy and paste the link into
a Canvas assignment submission area or email. There are two
options to copy the link.
Use
the Copy and share this link to give others access to your
private ePortfolio link [1]. You can now copy and paste the link into
a Canvas assignment submission area or email. There are two
options to copy the link.
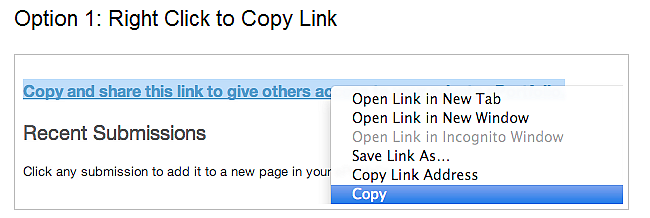
Right-click on Copy and share this link to give others access to your private ePortfolio to have the option to select Copy, and then paste the link in a Canvas assignment submission area or in your email.
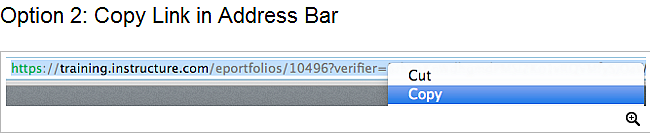
Once you click Copy and share this link to give others access to your private ePortfolio, a link will appear in your address bar. Highlight the link, right click it to have the option to select Copy, and then paste it in a Canvas assignment submission area or email.
![]()
How to access your E-Portfolio in the future:
- HOW TO ACCESS ePORTFOLIOS: Go back to the portfolio dashboard by clicking link below the Edit this page button. Right-click on the Copy this link option and submit to instructor on Canvas eportfolio assignment page. This lets the instructor make sure she/he can view all submissions. You do not have to submit again after the first time. Your instructor will see your updated content, and will not review it until the due date.
- Try to view your own submissions. You will likely get an error message. Try clicking "View original submission." Your portfolio should now display.
![]()
Sample Portfolios
Below are some examples of what the pages of a finished Canvas ePortfolio will look like:
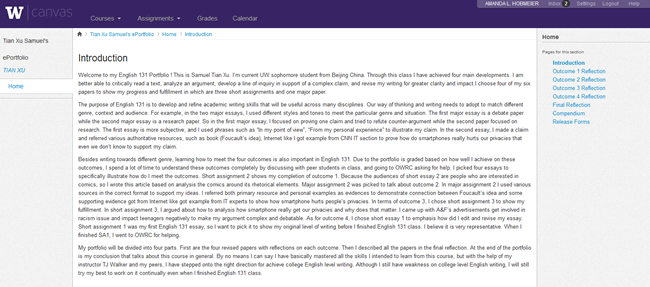
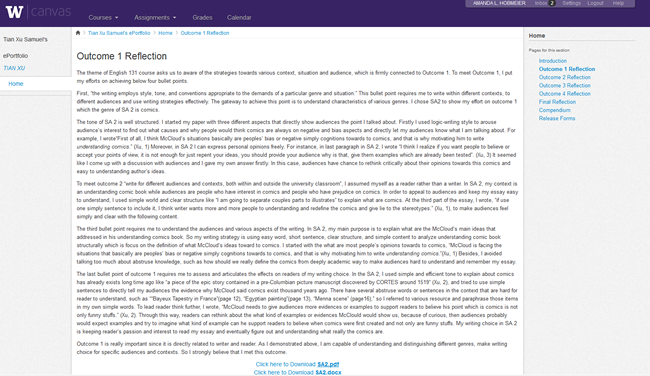
And here are some successful sample Canvas ePortfolios from former EWP 100-level Composition students:
![]()
Additional Resources