Preparing Images with Microsoft Photo Editor
Microsoft Photo Editor is an image editing program that may be installed as part of Microsoft Office. Before beginning this tutorial, select a digital image to edit.
Optimum Specifications for Web Images:
Resolution: 72 dpi
File format: JPEG (for photos), GIF(for graphics), or PNG
Image size: The smaller the better.
Generally less than half a screen (320 x 240 pixels)
Compression: As much as possible while retaining quality. (The level of compression is fixed for GIF's)
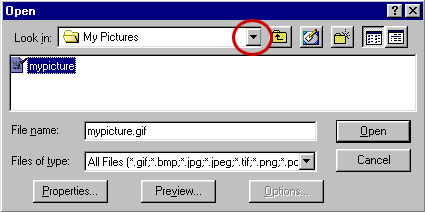
Step 1: Opening the Image
Open up Microsoft Photo Editor (the default location for this program is Start / Programs / Microsoft Office Tools / Microsoft Photo Editor). Go to the File menu and select Open. Use the arrow next to the Look in: box to browse to the folder containing your image. Select your image file and click Open.
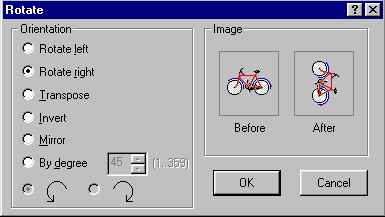
Step 2: Rotating the Image.
If the image is upside-down or sideways, rotate it to the correct orientation. To do this, go to the Image menu and select Rotate, then select the appropriate Orientation and click OK to rotate it.
Step 3: Cropping the Image
Use the Select Tool ![]() to select the area you wish to keep (to change your selection, press the ESC key to deselect). Go to the Image menu and select Crop, then OK to crop the photo to include only the selected area.
to select the area you wish to keep (to change your selection, press the ESC key to deselect). Go to the Image menu and select Crop, then OK to crop the photo to include only the selected area.
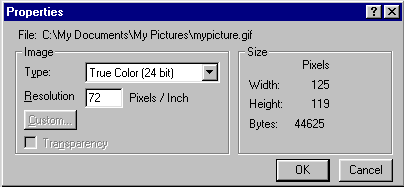
Step 4: Setting the Resolution and Resizing the Image
Go to the File menu and select Properties. In the Resolution box, enter in 72 Pixels/Inch and click OK.
Next, go to the Image menu and select Resize. The Image Size dialog box appears. Make sure the Allow Distortion box is not checked. Change either the Width or the Height of your image to the desired size, and click OK. If you aren't satisfied with the re-sampled image, always undo changes before you resize it again (or the image will be blurred). Remember that most users' monitors are set to 800 x 600 pixels, so you usually want to make your images smaller than this.
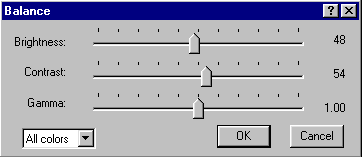
Step 5: Adjusting Brightness and Contrast (Optional)
If your image is too bright or dark, or needs to have the contrast adjusted, go to the Image menu and select Balance. Try adjusting the Brightness (amount of light) and Contrast (difference between dark and light pixels) until you are satisfied with the image.
Step 6: Saving the Image as a JPEG or GIF file
To save your edited image (yet still preserve the original if you need it later), go to File menu and select Save As. Give your image a meaningful title. Make sure that the Save as Type selected is JPEG for photos or GIF for graphics. Click OK (or for JPEGs, you can click More and adjust the JPEG Quality Factor slider to give the fastest download speed with a reasonable image quality).