Trimming videos
Trimming allows you to delete material at the beginning and end of a video in order to highlight a particular scene or to eliminate unneeded footage to create a shorter video.
NOTES:
- Trimming the video doesn’t actually eliminate the portion that is trimmed; it simply creates a new copy with different beginning and ending frames. The original video remains in your library in its entirety.
- You can only trim individual videos; you cannot trim movies. Videos are what you import directly from the camera; movies are imported videos that you have edited.
- You can also now trim videos directly while they are on the camcorder (without downloading them to the computer first). If a video is still on the camcorder if you Save the trimmed clip it will overwrite the original file.
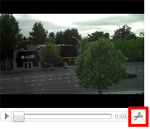 Step 1
There are two ways to begin the trimming process. One way is to select the video you want to trim, go to Edit > Trim Video. The other is to click the Trim button in the bottom right corner of the video thumbnail, as shown on the right.
![]() Step 2
Step 2
The Trim window will open, and you can click and drag the left trim tool slider to the desired position in the play bar where you want the trimmed video to begin.
Step 3
Drag the right slider to the relative position in the bar at which you want the trimmed video to end.
Step 4
If you want to create a new copy of the video and keep the old copy, click the Save as button, then enter a name for the trimmed video. If you want to overwrite the current video, click Save. Note that the old, untrimmed video still exists; it can be opened by re-opening the trim wizard. If you want to restore it, simply drag the trim bars back to the end positions.
Modified from FlipShare Help Guide.