CIC Faculty Guide Online
Uploading Files
The easiest way to share course materials with students is to upload them as document, image or PowerPoint files..
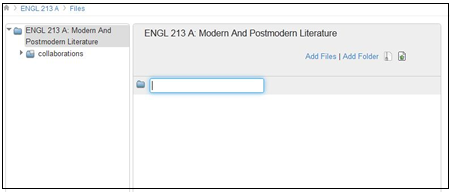
Creating Folders for Files
If you plan to upload a large number of files, you may wish to create folders to organize them. To do so:
- Open the files page by going to Files on the navigation bar.
- Select Add Folder and type a folder name in the box that appears.
- Your newly created folder will appear on the Files screen.
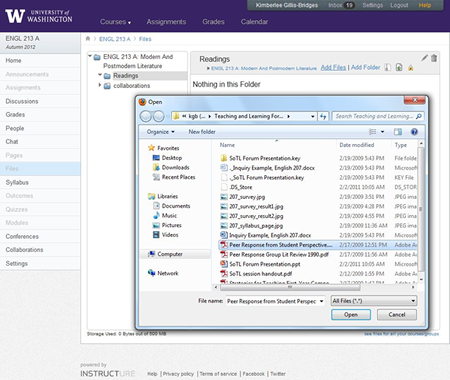
Adding Files
To add files to a folder or the Files page:
- Open the files page by going to Files on the navigation bar. If you want to upload the file to a specific folder, click on that folder's icon to open it.
- . Click Add Files. A dialogue box will appear. Locate and select one or more files on your hard drive, and click Open. You'll see a message confirming file upload.
- Your newly created folder will appear on the Files screen.
Renaming, Deleting, and Reordering
- To rename a file or folder, place your cursor on the file or folder name and click the pencil icon from the menu that appears. Type the new folder name in the box that appears.
- To delete a file or folder, place your cursor on the file or folder name and click the garbage icon from the menu that appears.Click OK in the box that appears to confirm deletion.
- To reorder a file or folder, place your cursor on the file or folder name and click the double arrow icon from the menu that appears. Drag the file or folder to its new location.
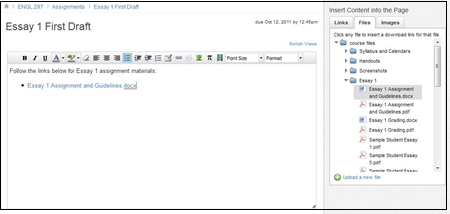
Inserting Files into Pages
Once you upload a file, you can insert a link to it in your syllabus, assignments, discussion or informational pages. To do so:
- Begin creating your assignment, syllabus, discussion or other page.
- In the Rich Content Editor, type text to introduce your content (if you wish) and place your cursor where you want the link to appear.
- Select the Files tab in the right-hand Sidebar and click on the folder icons to locate the file you wish to link.
- Click on the file name, and a link to it will appear in the Rich Content Editor.
- Click the Update or Save button to save your content.
- Students may preview files within Canvas by clicking the preview icon or may download files to their computers by clicking Download in the preview window or by clicking the file name.
- Note that you can insert links to any type of file content you have uploaded: Word document files, PDFs, PowerPoint slides and images. While document and PowerPoint files will appear as linked text, images--which you locate and insert by clicking on the Images tab--will be embedded on your page.