
CIC Faculty Guide Online
Panopto
What is Panopto?
Panopto is a video sharing platform that enables you to create, upload and share recordings. It is available on all CIC computers and is accessible to anyone with a UW Net ID.
You can use the tool in a variety of ways to support your teaching. You might consider using it to create and upload student videos as part of a Canvas discussion, to introduce multimodal assignments, to draft and practice student presentations, or to capture your own lectures so that the students may watch them again or at a later time. It can also be helpful in keeping an archive of student conferences or presentations to use as models for future classes.
Below, you'll find instructions on some of the most useful ways to integrate the technology of Panopto into the classroom.
Making a Panopto Recording
Panopto is free for all UW students, faculty and staff. In order to create a new recording, first log in here: https://panopto.uw.edu
If necessary, download the Panoptico Recorder by clicking the icon in the upper right corner of the screen.
![]()
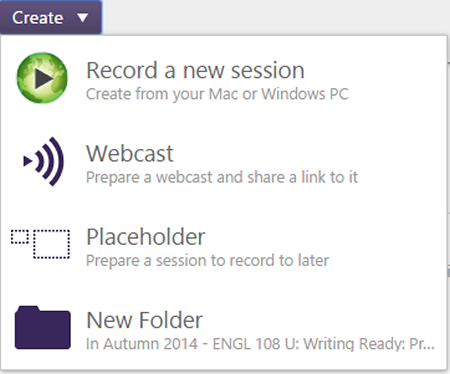
After you've downloaded and installed the recorder, you will be able to create and upload videos. To start the process, first click Record a New Session from the drop-down menu near the top of the screen.
This will automatically launch the recorder and open a new window, where you can create and control your recording.
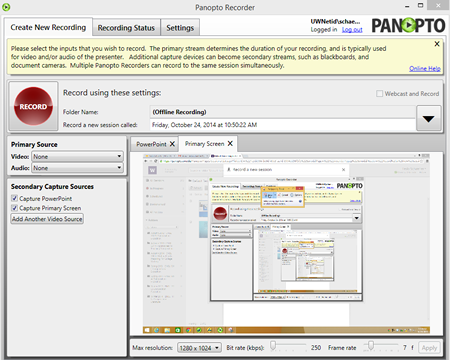
Before you begin, think about what you would like the recording to display. If you select Primary Screen, the recording will show the presenter and display exactly the same images as those on the presenter's computer screen. Selecting PowerPoint will prompt you to open a PowerPoint presentation, and will enable you to display that presentation alongside the speaker.

When you are ready, click Record to begin.

After you are finished recording, Panopto will prompt you to upload the video to a folder. Each of your classes is automatically designated its own folder, and you can also create and manage new folders on the homescreen. Once your video is uploaded, you can share it in several ways. Below, there are instructions for sharing videos on Canvas and with UW colleagues or the public at large.
Adding a Panopto Recording to Canvas
Discussions
One way to use Panopto on Canvas is to have students create and upload a video response to a discussion question you have posted on Canvas.
Depending on the purpose of the assignment, consider whether you want the student to respond right away on video, to work with peers in creating a planned or scripted response, or to model their response after a conference presentation or speech. It will be useful to think of the video in the context of the specific genre you are addressing or scaffolding in class.
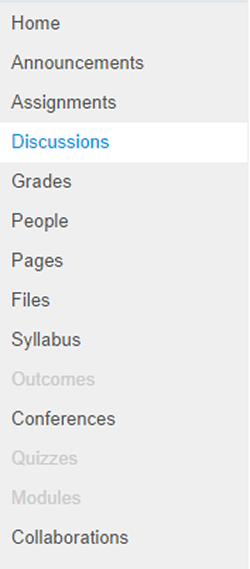
In order to create a space where students can upload their videos, first select Discussions from the right-hand menu on Canvas.
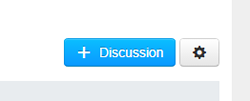
Next, add a new Discussion by clicking on + Discussion in the upper right hand corner of the screen.
In the space provided, compose a discussion question. You may also want to include instructions on how you would like students to upload or embed their video responses, especially if it is your first time using Panopto in this capacity in class.

Embedding Video Responses
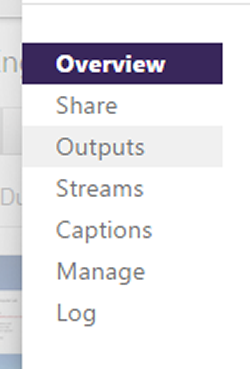
Have students record their videos in response to your question using Panopto, as shown above. After they are finished recording, they should stay on their Panopto home page. Have them hover over the video and click Settings.
In the window that opens, they should select Outputs from the lefthand sidebar.
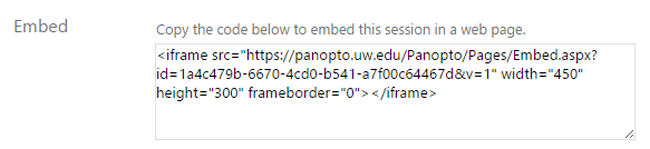
Next, they should scross down to the Embed field and copy the code there.
Back on their Canvas Discussions page, instruct them to select Reply and then click on HTML Editor in the upper right hand corner of the reply window.
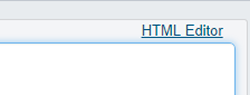
Next, they should paste the embed code in the window.

After they hit Post Reply, their video will appear as a response to your discussion question. You may consider giving students some time to watch and respond to the videos of their peers, either in class or as a follow-up homework assignment.

Inserting Links to Videos
Alternately, you may prefer to have students simply share a link to their videos in the Reply section under your discussion question. This can be slightly more straight-forward and famiiliar to students.
To do this, students should navigate to their Panopto home page and locate the video they want to post.
Ask them to hover the mouse over the video, and select Share.
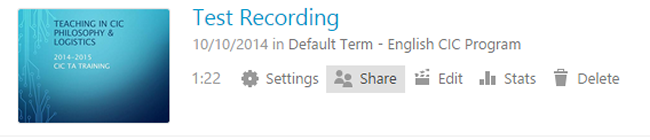
Next, in the window that opens, they should select and copy the Share link, and then paste it into the Canvas reply window.
A link to the video will now appear as the student's reply to your discussion question.
Using Panopto to Create Pages
Panopto is also an excellent resource for using Canvas Pages to create an archive of recorded lectures, make your lectures available online for your students, and/or upload videos as Files so that you can use them in any classroom context. You may also want to start archiving student work such as presentations or conferences, so that you can use those videos as models for your classes in the future. Finally, you may use Pages as a storage space for student videos, so that they can draft and practice their presentations and continually upload new videos to reflect their revision.
To upload a Panopto video to a Canvas page, first create a new page by following the steps on the CIC Faculty Guide.
Next, simply follow the steps above to embed or link to the video that you would like to share.
Sharing Recordings
Panopto recordings can also be shared with people who are not enrolled in your course, such as teaching assistants, other students and UW colleagues. Remember that your current students are automatically copied to Panopto, so there is no need to add them.
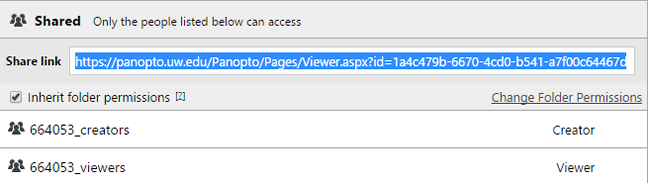
To share a Panopto recording with others, first click on the video you would like to share. Next, however over the video and select Share from the menu that appears.
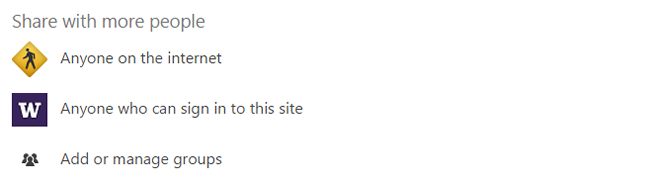
To share the video with viewers who do not have a UW Net ID, select Anyone on the Internet.
To make the video available to only those who have a UW Net ID, select the second option.
Note: UW IT Connect strongly discourages using this option, since it will cause the video to display in every Panopto account, and therefore flood the system with work that may be irrelevant to most people. Selecting "anyone on the internet" does not cause this to happen.
In order to add a TA or colleague, enter their UW Net ID in the space provided, determine their access level, and then lcik the Notify and Share button.
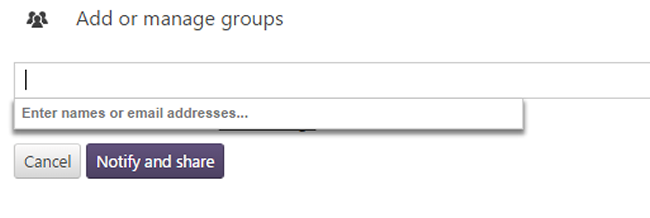
The added participants will now be able to see the video.
Additional Resources
- http://www.washington.edu/itconnect/learn/tools/panopto/faqs/
The UW IT Connect FAQ page on Panopto - http://www.washington.edu/itconnect/learn/tools/panopto/add-a-panopto-recording-to-canvas/
The UW IT Connect page on Adding Panopto Recordings to Canvas
![]()