
CIC Faculty Guide Online
The cic lan (local area network)
Each CIC course has a folder on the English Department's LAN, or local area network. Students must log on with a special username and password to access course materials you place on the network, to submit documents and to share their work with classmates. Because students have a common username, every class member can view any document an individual user saves to the class folder. The CIC Student Guide describes the basics of working on a network. Refer students to the guide as you introduce them to the class network space.
Logging On/Off the LAN
Logging On
To log on, students should simultaneously press the Ctrl, Alt and Delete keys. In the box that appears, they should enter the username and password distributed during CIC training. Note that the Domain box should read English.
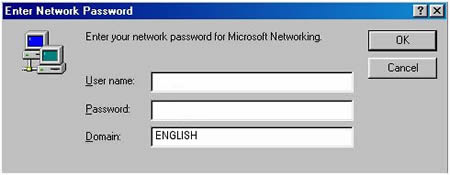
If the screen displays a desktop instead of a logon box, the student should first log off the machine. Once students have logged on, they can use My Computer or Windows Explorer to locate the class folder.
Logging Off
Students should log off before they exit the lab classroom. Doing so prevents other users from accessing your class's materials. To log off, students should:
- Click the Start button at the bottom left of the screen and choose Shut Down.
- In the shut down box that appears, choose Log Off and click OK.
![]()
Instructor vs. Student Logon Privileges
Just as students can access each other's documents when they log on with their CIC class account, so too can you view other instructors' course materials and a Swap archive of CIC assignments when you log on with your personal username and password. Once you become a CIC instructor, systems analyst Rob Weller will add CIC privileges to your existing account--the one you use to log on to the computer in your office.
The table below outlines your instructor privileges versus those of your students.
| Student Privileges | Instructor Privileges |
| Can see and use files in the class directory on the L: drive. | Can access files in the class directory on the L: drive as well as files for other current CIC classes and the Swap folder of sample CIC materials on the K: drive. |
| Can save files to the L: drive, but not to other English server drives. | Can save files to the class directory on the L: drive, a personal folder on the TA (N:) drive, and the Swap folder on the K: drive. Can copy and move files between these drives, both in the computer classrooms and in the office. |
| All material saved on the network is public. Anyone logging on with the class can view it. | Content saved to the class directory is public, but can use the TA (N:) drive as a private space to store upcoming assignments, quizzes, or grades. |
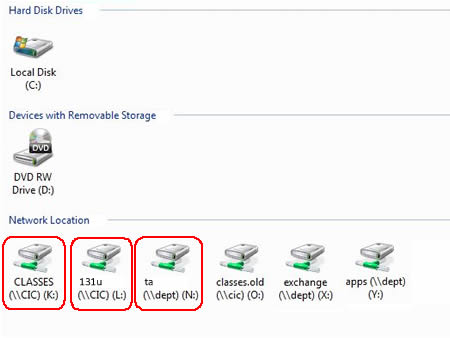
We suggest that, when teaching in the lab classroom, you log on with the class account. This way, the image projected from your instructor computer looks the same as the screen students see on their machines. When preparing materials in your office, log on with your personal account so that you have access to other drives you may need. To access files on any drive, use My Computer or Windows Explorer. To find your class folder, double-click on the icon for the L: drive; to see other CIC courses and the Swap folder, double-click on the icon for the K: drive. To find your personal folder, double-click on the icon for the N: drive and then on your folder.
![]()
Organizing Class Materials on the LAN
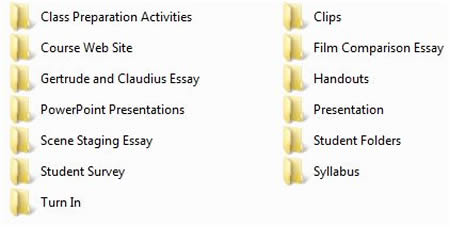
Over the course of the quarter, both you and your students will create a number of individual files. If you have 20 students and plan on having them create 12 documents over the course of the quarter, you would have 240 files in your class directory in addition to your assignment prompts and other course materials. To make locating files easy, separate them into multiple folders. The most common arrangements include the following:
- Categorical: Folders are created for each assignment and
other course materials. The categorical system also includes subfolders for
each student, organized into a main folder called "Student Folders," and a
"Turn-in" folder for students to submit work.
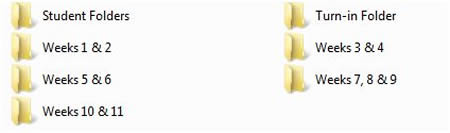
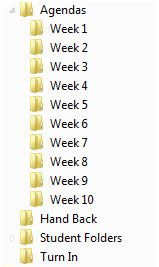
- Chronological: Folders are created for each class day, week,
or block of weeks. All materials distributed during the time period (assignments,
group work prompts, lecture notes) are saved to that day/week's/weeks' folder. The
chronological system also includes subfolders for each student, organized into
a main folder called "Student Folders," and a "Turn-in" folder
for students to submit work.
- Combination: Folders are created for general document types
(assignments, agendas, course materials). These folders contain subfolders
for each class day, week, or block of weeks. The
combination system also includes subfolders for each student, organized into
a main folder called "Student Folders," and a "Turn-in" folder
for students to submit work.
![]()
Creating Read-Only Master Files
Often, you will want your students to work with a file that you have created in Microsoft Word. To protect your original file from overwriting, making it “read-only, shareable.” This means that students can see the document's content, but if they want to make any changes, they will be forced to save the file with a new file name. You can create read-only files by using My Computer or Windows Explorer:
- From the desktop,open My Computer or Windows Explorer and locate the file that you want to protect.
- Right-click on the file’s icon. A pop-up menu will appear. Click on the last item in the menu, Properties.
- In the Properties window that appears, find the General section, and
click on the box for Read-only. A checkmark should appear in the box.
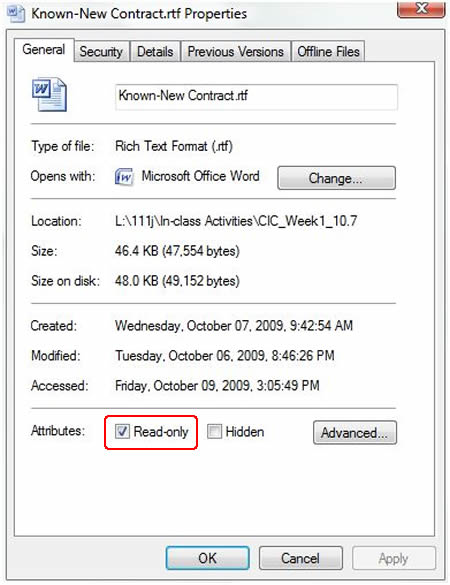
- Click OK. Your file is now protected. If you need to make any additional changes to this file, you will have to unprotect it first by deselecting the Read-only option. Note that you can change a document's properties only when logged on with the same account you used when designating the file read-only.
When you want students to work with a read-only file, ask them to rename and save the file by selecting Save As from the Office Button menu. Once they have renamed the file, they will have their own copies to modify.
![]()
Naming and Saving Files on the LAN
Both you and your students can easily identify and locate work when you
use a consistent system for naming files. In CIC we have students use a simple
system for naming files
in order
to prevent documents from being overwritten. Each file name consists of three
components--a root name, a personal identification, and an extension. For example,
a CIC file name might look like this: Essay1T.docx. We suggest
you use the following guidelines to instruct your students in naming all files
saved to the network:
- Root Name: The root name identifies the assignment. Always give students a specific root file name to use when they save something to the LAN so you can tell at a glance what is in the file. In our example, Essay 1 is the root name.
- Personal Identification: Assign students a single letter of the alphabet as personal identification and always insist that they add this letter to the root file name when they save a file on the LAN. If you do not wish to use letters, you may substitute student names or initials. The personal identification code is placed immediately after the root name. In our example, the assigned letter T identifies the author of the work. Since students have unique identifiers and, therefore, unique file names, their work will be safe from overwriting.
- Extensions: Windows-based programs will automatically add extensions to file names. These extensions identify the type of document. For example, Word documents will have a .doc or .docx extension, as in our example. If students use My Computer or Windows Explorer to rename files, they should take care not to delete the file extension.
This system can be easily adapted for student reviews and peer editing; if the reviewer adds his or her identification code after the author's code, you can quickly identify both students who worked on the document. For example, our students have a writing assignment on a short story by Melville, and you want them to do peer reviews. You tell your students that the root name of the file will be Melville, and you will have assigned each student a letter as identification for the term. Student T’s file name will be: MelvilleT.doc. When student L reviews this document, he or she will create a second copy of the essay, with a new file name, that will include his or her comments. Using Save As, the student will save the new copy as MelvilleTL.doc, adding his or her identification immediately after the identification of the original author.
![]()
Teaching Students Your Naming and Saving System
In order to work effectively on the class network, students will need to learn your file naming and folder organization system. You can teach them via an electronic version of a standard first- or second-day class activity. The "Sample Activities" section below links to such materials used in past CIC courses. The activities involve four basic steps:
- Creating and saving to your class folder a read-only document such as a student survey or close-reading exercise for students to modify.
- Using the lab classroom projector to lead your class through the process of locating and opening the master document. As you do so, explain your file organization system.
- Asking students to save a personal copy of the file, renaming it according to your conventions and saving it to a specific folder before they begin working.
- Directing students to save a copy of their completed work to other locations (if applicable). For example, if you plan to have students save all coursework in both their student folders and a turn-in folder or their student folders and a Collect It dropbox, have them practice saving to all these locations.
![]()
Transferring Files to and from the LAN
Because the English network is not accessible via modem, both you and your students will need several reliable ways to transfer files from home to lab computers. The CIC Student Guide lists common file transfer methods and includes instructions for File Manager, Catalyst's web-based file transfer platform, and the WinSCP file transfer program included in the UW IT Connect tools for secure computing. Please note that you can save materials created on your office computer directly to your class folder on the L: drive. You can also access documents students have created or saved in your class folder from your office.
![]()
Sample Activites
To view sample first-week activities that incorporate teaching of file naming and saving, follow the links below. Note that sample materials may be password-protected with the username and password distributed in 131 TA training.
- 1950s--Ideal Family or Concealed Fear?
Exercise that asks students to apply concepts from a course reading to a web site featuring a home economics textbook from the 1950s. Students are prompted to rename and save a personal copy of the worksheet before beginning the exercise. - Hamlet Passage Analysis Practice
In-class exercise introduces students to close reading of drama and models a passage analysis homework assignment. The whole class collaborates on annotating the beginning of the scene; students individually mark the rest of the passage and present their notes to the class. - "History": Warm-Up Exercise
In-class pre-reading activity to prepare students for reading done as homework. - Rhetorical Situations
Activity to support discussion of rhetorical situation. Students are asked to list and evaluate rhetorical situations they've encountered over the past 24 hours. Instructor orally prompted students to rename and save the file in their student folders. - Student Surveys
One common activity used to acquaint students with locating and saving files on the CIC network is the student survey. The following samples were used in a range of writing courses: - Student Survey Instructions
Document includes instructions for saving to both student and turn-in folders.
![]()